Chapter 2 Operating Principles
2-1. Operation of Each Mechanism
2-11 CL-S700/CL-S703/CL-S700R
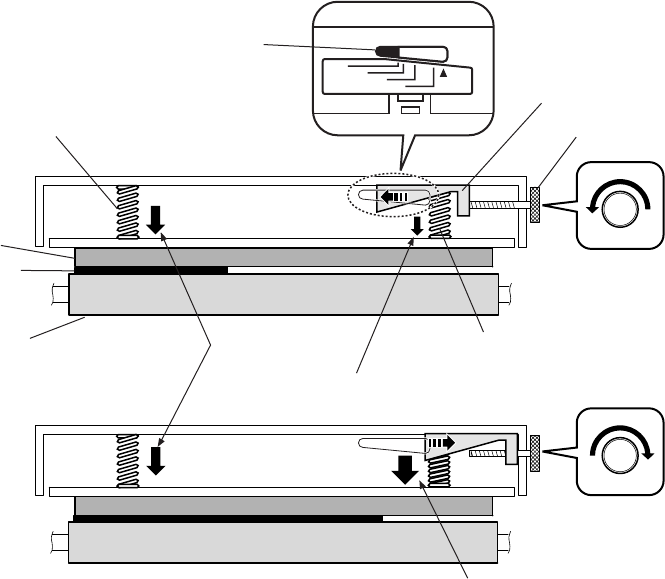
2-1-6. Head Balance Adjustment Mechanism
The major components of the head balance adjustment mechanism are:
(a) Adjust Screw (Media width adjustment knob)
(b) Slider
(c) Head Spring L/R
The head balance adjustment mechanism is used to eliminate uneven printing density on the left
and right sides of media. The head balance adjustment is accomplished by changing the right side
head pressure according to media width to be used. To change it, the Adjust Screw (Media width
adjustment knob) is used.
When narrow media is used (needs to give weak pressure on the right side):
As you can see from the figure, the Head Spring L pushes the left side “Unit, Head” against the
platen, at a constant pressure. While the Head Spring R pushes the right side “Unit, Head” against
the Platen SA via the Slider. Since the Slider has taper shape on its bottom, the pressure that is
developed by the Head Spring R varies with the Slider position. As the Slider moves toward the left
(or the Adjust Screw is turned counterclockwise), the Head Spring R gives a weaker pressure to
the “Unit, Head”. While, it moves to the right, a stronger pressure is given.
For example, when narrow media is set, since no media exists on the right side, the right side
pressure of the “Unit, Head” must be weak. Otherwise, the “Unit, Head” will slant toward the right
and pressure is not appropriately given to narrow media, resulting in uneven printing density.
To obtain optimum printing result, you need to move the Slider to the left by turning the Adjust
Screw, while viewing the indicator in the media width check window.
25
50
75
100(mm)
Head Spring L
Head Spring R
Platen
Head Unit
Constant
pressure
Pressure: Low
Pressure: High
Adjust Screw
Slider
Media width
check window
[For wide media]
[For narrow media]
Media


