


Chapter 3 Disassembly and Maintenance
3-5. Disassembly, Reassembly and Lubrication
3-35 CL-S700/CL-S703/CL-S700R
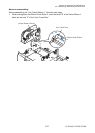
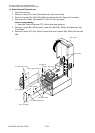
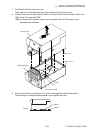
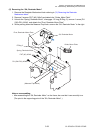
7. Fully slide the Printer part to the rear.
Then, each claw of the Rewinder part comes off the slit on the Printer part.
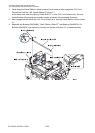
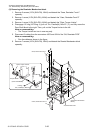
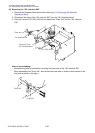
8. Lift the Printer part and disconnect 2 cables (J15 and J16) from the connectors (J501 and
J502) of the “SA, Rewinder PCB”.
Tips: To disconnect the cables easier, you can carefully put the Printer part on the
Rewinder part widthwise.
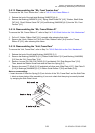
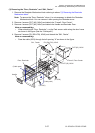
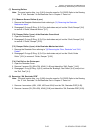
9. Remove the Printer part and place it so as not to damage the cables at the bottom.
The following is an example where spacers (not supplied) are used.
Cables
(Printer Part)
Spacer
Spacer
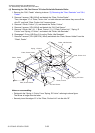
J16
J15
J502
J501
SA, Rewinder PCB
(Rewinder Part)
(Printer Part)
Claws (6 pcs.)
Slits(6 pcs.)