


Chapter 2 Operating Principles
2-1. Operation of Each Mechanism
CL-S700/CL-S703/CL-S700R 2-14
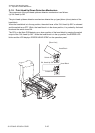
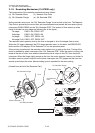
2-1-9. Rewinding Mechanism (CL-S700R only)
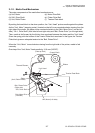
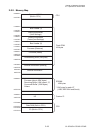
The components of the rewinding mechanism are as follows:
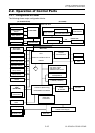
(a) SA, Rewinder Motor (c) Measure Flap Plate
(b) SA, Rewinder Flange (e) SA, Rewinder PCB
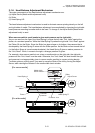
As the rewinder motor turns, the “SA, Rewinder Flange” turns to wind up the liner. The Measure
Flap Plate is pushed by the wound liner and turns backward and passes the form sensor (photo
interrupters PS501/PS502) on the “SA, Rewinder PCB”. The amount of liner wound up at the
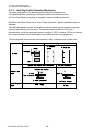
flange is divided into four stages as follows (refer to the figure):
1st stage: PS501: ON, PS502: OFF
2nd stage: PS501: ON, PS502: ON
3rd stage: PS501: OFF, PS502: ON
4th stage (Full): PS501: OFF, PS502: OFF
The rewinder motor speed to wind up the liner is changed in 1st to 3rd stages (fast to slow).
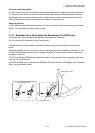
When the Full state is detected, the CPU stops rewinder motor. In this state, the ERROR LED
blinks and the LCD displays “Error Rewinder Full” on the operation panel.
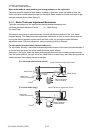
When printing is performed, the rewinder motor starts to turn to wind up the liner. Turning of the
motor is detected by photo interrupter of the “SA, Rewinder PCB”. While the motor is turning, the
blade at the end of motor turns and the intermittent pulse is output to the CPU from the photo
interrupter. When the flange tightly wound up the liner, the motor stops as it cannot run further. In
this state, since no pulse is output from the photo interrupter, the CPU judges that the liner has
wound up and stops the motor. Above winding cycle is repeated for the next printing.
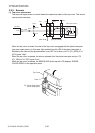
[Viewed from the left of the Rewinder Part]
SA, Rewinder Flange
SA, Rewinder Motor
(Photo Interrupter)
(Blade)
Liner
Plate, Measure Flap
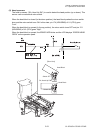
SA, Rewinder Flange
PS501PS502
SA, Rewinder
PCB
Liner
Error: Rewinder Full