


Chapter 3 Disassembly and Maintenance
3-5. Disassembly, Reassembly and Lubrication
3-41 CL-S700/CL-S703/CL-S700R
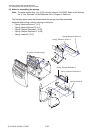
(7) Removing Rollers
Note: The parts location Nos. (e.g. [2-61]) show the ones for CL-S700R. Refer to the Drawing
No. 2 “Unit, Rewinder” for the Rewinder Part in Chapter 5 “Parts List”.
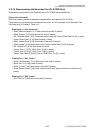
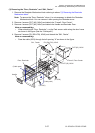
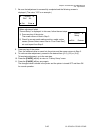
(7-1) Measure Sensor Rollers (4 pcs.)
1. Remove the Rewinder Mechanism block referring to “(2) Removing the Rewinder
Mechanism block”.
2. Disengage 2 E-rings (E-Ring, 3) [2-61] on both sides and pull out the “Shaft, Damper” [2-6]
to remove 4 “Roller, Measure Sensor” [2-7].
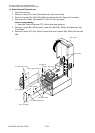
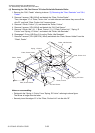
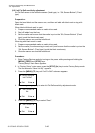
(7-2) Damper Roller (3 pcs.) of the Rewinder Cover block
1. Open the Rewinder Cover.
2. Disengage 2 E-rings (E-Ring, 3) [2-61] on both sides and pull out the “Shaft, Damper” [2-6]
to remove 3 “Roller, Damper” [2-22].
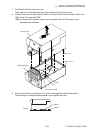
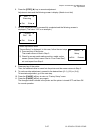
(7-3) Damper Roller (4 pcs.) of the Rewinder Mechanism block
1. Remove the Rewinder Door referring to “(3) Removing the “Door, Rewinder” and “SA1,
Peeler””.
2. Disengage 2 E-rings (E-Ring, 3) [2-61] on both sides and pull out the “Shaft, Guide
Roller ”[2-21] to remove 4 “Roller, Damper” [2-22].
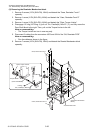
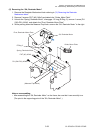
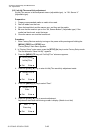
(7-4) Peel Roll on the Printer part
1. Open the Rewinder Cover.
2. Remove 2 screws (PH (SW+PW), M3x5) [1-49] and detach the “SA2, Peeler” [1-45].
3. Disengage 1 E-ring (E-Ring, 4) [4-9], remove the “Bushing2, Peel Roller” [4-8], and pull out
the “Roll, Peel” [4-1].
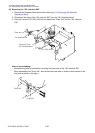
(8) Removing “SA, Rewinder PCB”
Note: The parts location Nos. (e.g. [2-59]) show the ones for CL-S700R. Refer to the Drawing
No. 2 “Unit, Rewinder” for the Rewinder Part in Chapter 5 “Parts List”.
1. Remove 4 connectors (J501, J502, J503 and J504) from the “SA, Rewinder PCB” [2-59].
2. Remove 4 screws (PH (PW+SW), M3x5) [2-64] and detach the “SA, Rewinder PCB” [2-59].