


MIL-3000FTX Series of FastPort Print Servers 2-7
2.8 Using Digi's ACT to Assign an IP Address
Digi's ACT can be used to configure options on FastPort.
Note:
If ACT has not been extracted from the utility portion of the CD-ROM to your local
drive, do so now.
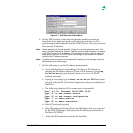
1. Select Advanced Configuration in the “Configure” pull-down
menu.
2. In the next menu, select Print Server Configuration.
3. From the list of print servers, choose the appropriate print server that is
to be configured and press [return].
4. In the next menu, scroll down to select the IP address field and press
[return] to enter new IP address.
5. When finished with the configuration, press the [esc] key to close all the
open windows.
6. To exit and save the configurations:
a. Select Reset Print Server in the “Configure” pull-down
window.
b. Select the print server just configured. This resets FastPort.
7. Exit out of ACT and ping the server to verify the new IP address
responds correctly.
FastPort is now ready for use on the IP network.
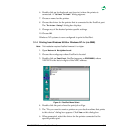
2.9 Using Appletalk to Assign an IP Address
Download the Setup Defaults file and the Apple Printer Utility
from the Appletalk portion of the CD-ROM. See Chapter 6 for more
information on the Apple Printer Utility. To assign the IP address using
Appletalk:
1. Double click on the SetUp Defaults file to edit it.
2. Scroll down and select the IP address option under “General
Parameters.” Change the values of the IP address in parentheses.
Remove the % sign before the IP Address option.
Warning:
Do not edit the top three lines of the file.
3. Save the changes and quit the editor.