


MIL-3000FTX Series of FastPort Print Servers 4-3
4.2.2 Using PCONSOLE to Install a Print Server
FastPort can be configured for printing without a config. file. This
eliminates the need for the directory SYS:LOGIN\MILAN, its configuration
files, and the ACT software.
1. Create a print server called FPXXXXXX with PCONSOLE (where
XXXXXX is the unit’s six digits Ethernet address).
2. Create a queue for FastPort using PCONSOLE.
3. Assign the queue created to the print server FPXXXXXX. and power
cycle FastPort.
4. To send data to the serial port instead of parallel (default), create a
queue name ending with -S using PCONSOLE. To send data to parallel
port 2/3 or serial port 2, create a queue name ending with -P2, -P3, or
-S2, respectively.
4.2.3 Adding Users to the Notify List with PCONSOLE
1. In PCONSOLE, select the following sequence of options:
a. Select Print Server Information and choose a print server.
b. Select Print Server Configuration.
c. Select Printer Configuration.
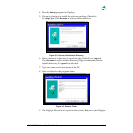
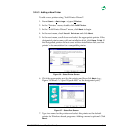
2. From the configured printers list, select Printer0 Configuration.
The “Define Printer Type” box appears.
3. Select the printer description Defined elsewhere.
4. Press [esc] until the Print Server Configuration menu appears.
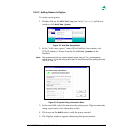
5. Select Notify List for Printer.
6. Select Printer0 from the Defined Printers list.
7. Press [ins] and select a user from the pull-down menus.
4.3 Installing a Print Server in an NDS Environment
1. Create the print server, printer, and print queue (use PCONSOLE or
NWADMIN).
2. Configure a DS Tree Name and DS Context Name in FastPort.
Note:
ACT can be used to configure parameters on FastPort. FastManage can also be used
to configure those two parameters on FastPort.