


MIL-3000FTX Series of FastPort Print Servers 5-17
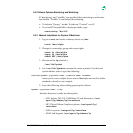
5.6.2 Installing and Printing with DG/UX
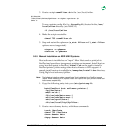
After adding the IP/Ethernet addresses, define a printer. Before doing so,
configure FastPort (if not already done so). Use the “Use-ACK” setting for
the parallel port when printing to impact printers. Define the printer by
using sysadm:
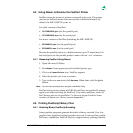
Device -> Printer -> Devices -> Add
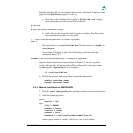
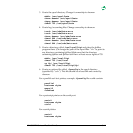
1. Enter the printer name (for example, “laser”).
Printer name: laser
2. Add a connection: “remote to networked printer device.”
Connection type: [Local /dev/tty or /dev/lp] Remote
to networked printer device
3. Accept the Quick Add feature by pressing Enter.
Quick Add using default values? [yes].
4. Supply a printer type (e.g., DG model 6773 PS printer). To view a list of
valid printer types, type [?] and press [Enter].
Printer type: [printer-80] PS-b
5. Enter an input type. For PostScript printers, type “PS.”
Input types: [simple] PS
6. Enter the interface script name.
Interface script: [termprinter] fastport
7. Enter the name of the printer device.
For a list of attached devices, check the file /etc/hosts or use sysadm
to list the host names that NIS provides.
Networked printer device name: fastport2-pr
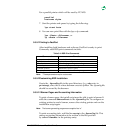
8. Enter the port number of the printer on the network printer server. Port
numbering for FastPort includes:
– 3100FTX: 2000 for the parallel port and 2001 for the serial port
– 3200FTX: 2010 (2000) and 2011 for parallel ports 1 & 2; 2020 (2001)
for the serial port
– 3310FTX: 2010 (2000) and 2011 for parallel ports 1 & 2, 2012 for
parallel port 3; 2020 (2021) for the serial port