116 C1553M-B (4/05)
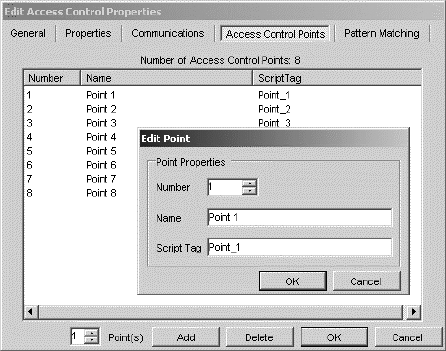
Edit an Access Control Point
Edit each access control point so that the point’s number is the same as the point number sent out in the string for that type of alarm. You can
also change a point’s name and script tag, or use the generic name and tag assigned by VMX300(-E).
1. Double-click the desired access control point. The Edit Point dialog box opens.
Figure 143. Edit Point Dialog Box
2. Type a new point number. Set this number to match the point number sent out by the access control device when that type of alarm occurs.
VMX300(-E) manages an alarm only if the point number in the string matches a point number on the Access Control Points tab. VMX300(-E)
discards any incoming alarm that does not match the number of a point defined on the Access Control Points tab.
3. (Optional) Type a new point name. The name appears in the Device Control dialog box in the VMX300(-E) client. The name must be unique
and can include any letter, digit, or special character, with the exception of single and double quotation marks. The name is not case
sensitive. For example, NW door card reader is equivalent to NW DOOR CARD READER.
4. (Optional) Type a new script tag for the point. Use the script tag to refer to the point in scripts and expressions. For more information, refer
to Access Control Device Properties Exposed for Scripts and Expressions.
Script tags are at most 50 characters long. They can include any letter, digit, or the underscore character, but cannot begin with a digit.
They cannot contain spaces or special characters. Script tags are not case sensitive. For example, Door_1 is equivalent to DOOR_1. The
script tag must be unique.
5. Click OK. The Edit Point dialog box closes. The new numbers, names, and script tags appear on the Access Control Points tab, and in the
Device Control dialog box in the VMX300(-E) client. The device’s read and write properties are renamed based on the new script tags.


