


4 – Installation
Installing a Switch
59043-06 A 4-5
0
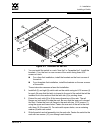
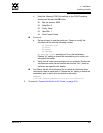
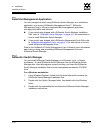
Figure 4-2. SANbox2-64 Rail Kit
1. You can install the switch in a rack “fans first” or “faceplate first”. Install the
brackets (1) on the front or rear corners of the switch using three 8-32
screws on each:
For a fans-first installation, install the brackets on the front corners of
the switch.
For a faceplate-first installation, install the brackets on the rear corners
of the switch.
These instructions assume a fans-first installation.
2. Install left (2) and right (3) switch rails on the switch using six 8-32 screws (4)
for each. Be sure that the latch is closest to the end of the switch that will be
installed first in the rack and that the latch tab (5) is pointing down.
3. Extend the rack rails (6) to fit the inner dimensions of the rack. The rail
flanges on both ends fit inside the rack. Be sure that the inner rail is toward
the front. Fasten the front rail flange to the rack with two 10-32 screws (7)
using the upper and lower holes. Fasten the rear end of the rail to the rack
with three 10-32 screws (8). For racks with square holes, use a centering
washer (9) with each screw.
4. Slide the switch and rail assembly into the rack rails. Fasten the switch to the
rack with two screws (10), one through each bracket.
6
2
4
3
8
7
10
1
1
5
6
9
9