


4 – Installation
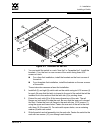
Installing a Switch
59043-06 A 4-13
0
7. When the installation is complete, start SANsurfer Management Suite using
the SANsurfer file from the SANsurfer Management Suite installation
directory. You can also start SANsurfer Management Suite by clicking the
SANsurfer icon (if installed) on the desktop or from the Start menu. In SMS,
Click the Switch tab in the left pane. From the Help menu, select About ...
and make note of the version number. Close SANsurfer Management Suite.
8. To ensure that you are using the most recent version of SANsurfer Switch
Manager, visit the QLogic support web page and go to Drivers, Software and
Manuals.
a. Select your switch model from the pull-down menu. Locate the
description for SANsurfer Switch Manager for Windows under
"Management Software".
b. If the release version number (4.02.xx) is greater than what is currently
installed on your workstation, down load the new version and proceed
to step 9. Otherwise, no upgrade is needed and the SMS installation is
complete.
9. To start the installer, open the zip file and run the
SANsurferSwitchMgr_Windows_4.02.xx.exe file.
10. When prompted for an installation directory, click the Choose button and
select the same folder as the SANsurfer Management Suite installation in
step 6. The default SMS installation directory is C:\Program Files\QLogic
Corporation\SANsurfer. Click the Next button.
11. When prompted for the location in which to create the program icons, click
the In an Existing Group radio button, then specify the same group that
was used for the SMS installation. The default SMS group is "QLogic
Management Suite". Click the Next button.
12. Click the Install button to the start the installation. When the installation is
complete, click the Done button.
13. In the SMS install directory, enter the following command to execute the
chglax.bat file. If prompted to overwrite an existing file, enter Y to do so.
chglax.bat
14. Start SANsurfer Switch Manager from SANsurfer Management suite as you
did in step 7 and confirm that the new version is running.