


132
Editing a Sample
Dividing a Sample into Notes
(Chop)
The
chop
function divides a sample waveform into separate notes.
* The Create Rhythm function (p. 128) makes it easy to create a rhythm
set from a chopped sample.
* You cannot execute this with more than one sample selected.
1.
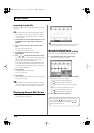
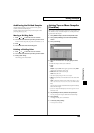
Press [SAMPLE EDIT] to access the Sample Edit screen.
2.
Press [3 (Sample Modify)] to access the Sample Modify
window.
3.
Press [3 (Chop)].
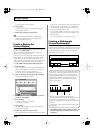
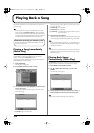
fig.Chop_50
Procedure for Dividing a Sample
You can freely specify the point(s) at which the sample is to be
divided.
1.
Press or to move the cursor to “Current Address.”
2.
Either turn the VALUE dial or use [INC], [DEC] to move the
point.
3.
At the location where you want to divide the sample, press
[4 (Add Point)].
The current location will be the dividing point.
4.
Repeat steps 5 and 6 to specify other dividing points as desired.
You can specify up to 15 locations at which to divide the sample;
i.e., the sample will be divided into a maximum of 16 pieces.
5.
Audition the sample as described in the section
“Auditioning the divided samples.”
If you want to re-make settings, press [7 (Cancel)], and move or
delete the point (p. 133).
6.
Press [8 (Exec)].
A message will ask you for confirmation.
7.
To execute the division, press [8 (Exec)].
* To cancel, press [7 (Cancel)].
When you execute the Chop operation, a message will ask
whether you want to execute Create Rhythm.
* The divided samples will be added to the sample list.
8.
If you want to execute Create Rhythm, press [8 (Exec)].
For the rest of the procedure, refer to
“Create a Rhythm Set
(Create Rhythm)”
(p. 128).
9.
If you don’t want to execute Create Rhythm, press [7 (Cancel)].
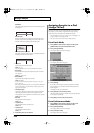
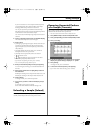
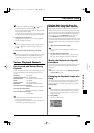
Automatically Dividing a Sample
(Auto Chop)
Here’s how you can automatically specify the points at which the
sample is to be divided, and then divide the sample.
1.
From step 3 of p. 132, press [6 (Auto Chop)].
The Auto Chop sub-window will appear.
2.
Either turn the VALUE dial or use [INC], [DEC] to select the
method by which the sample is to be divided.
•
Chop Type
Specify how the sample will be divided.
Value
Level:
Divide according to volume.
Beat:
Divide at beats based on the BPM (p. 116) of the sample.
Divide x:
Divide into ‘x’ number of equal lengths.
3.
Press .
4.
Either turn the VALUE dial or use [INC], [DEC] to set the
value.
•
Level (If Chop Type is Level)
Level at which the sample is to be divided. Lower settings of this
value will cause the sample to be divided more finely.
Value:
1–10
•
Beat (If Chop Type is Beat)
Beat interval at which the sample is to be divided.
Value:
1/32, 1/16T, 1/16, 1/8T, 1/8, 1/4T, 1/4, 1/2, 1/1, 2/1
•
Times (If Chop Type is Divide x)
Number of samples into which the sample is to be divided
Value:
2–16
5.
Press [8 (Exec)].
The sample will be automatically divided according to your
settings, and the points will be specified. A maximum of 15
division points will be set (16 regions).
To cancel, press [7 (Cancel)].
6.
Audition the sample as described in the section
“Auditioning the divided samples.”
If you want to re-make settings, press [7 (Cancel)], and move or
delete the point p. 133).
7.
Press [8 (Exec)].
A message will ask you for confirmation.
8.
To execute the division, press [8 (Exec)].
* To cancel, press [7 (Cancel)].
When you execute Auto Chop, a message will ask you whether
you want to execute Create Rhythm.
9.
If you want to execute Create Rhythm, press [8 (Exec)].
For the rest of the procedure, refer to
“Create a Rhythm Set
(Create Rhythm)”
(p. 128).
* The divided samples will be added to the sample list.
10.
If you don’t want to execute Create Rhythm, press [7 (Cancel)].
You will return to the Sample Edit screen.
Reference_e.book 132 ページ 2003年7月14日 月曜日 午後3時25分