


204
Installing the Wave Expansion Board
3.
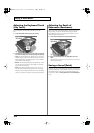
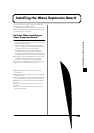
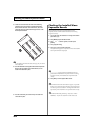
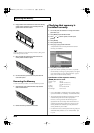
There are four slots inside. As shown in the following
illustration, plug the connector of the Wave Expansion
Board into the connector of the relevant slot, and at the
same time insert the board holder through the hole of the
Wave Expansion Board.
fig.18-04.e
If you install expansion boards of the same type, only one board
will be detected.
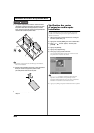
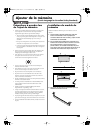
4.
Use the Installation Tool supplied with the Wave Expansion
Board to turn the holders in the LOCK direction, so the
board will be fastened in place.
fig.18-05.e
5.
Use the screws that you removed in step 2 to fasten the
cover back in place.
Checking the Installed Wave
Expansion Boards
After installation of the Wave Expansion Boards has been
completed, check to confirm that the installed boards are being
recognized correctly.
1.
Turn on the power, as described in “Turning On the Power”
(Quick Start; p. 4).
2.
Press [MENU] to open the Menu window.
3.
Press or to select “System,” and then press
[ENTER].
4.
Press [4 (System Info)].
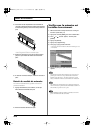
5.
Press [1(
⇑
)] or [2(
⇓
)] to select “SRX Info.”
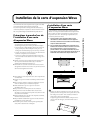
The System screen appears. Verify that the name of the installed
Wave Expansion Board is displayed.
fig.18-06
If “----------------” appears next to the installed slot name, it’s
possible that the installed Wave Expansion Board is not being
recognized correctly. Re-install the Wave Expansion Board
correctly.
6.
Press [EXIT] to exit the System Menu screen
If the model number of the board does not appear, it is possible
that the wave expansion board is not being recognized properly.
Turn off the power as described in “Turning On/Off the Power”
(Quick Start), and re-install the wave expansion board correctly.
If the SRX/RAM Mode parameter (p. 195) is set to “2 SRX/
288MB Max,” only the two slots EXP-A and B can be used.
Board holder
Position them as shown
before you install the board.
Connector
Wave Expansion Board (SRX series)