


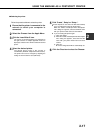


2-19
2
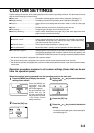
■ Installing the display fonts
The display fonts for Macintosh are contained in the Font folder of the AR-PK1 PRINTER UTILITIES CD-ROM.
Install the display fonts as needed.
Copy the required display font files to the Fonts folder under the System folder of your computer.
NOTE
If any malfunction occurs due to the installation of display fonts, delete the fonts from the system.
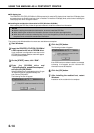
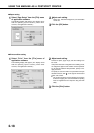
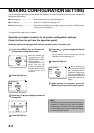
1
Click the [Select] button and select the PPD
files for your printer.
2
To register an account number for the
computer, click the [Add] button for
Account Number. The Account Number
screen will appear. Enter a 5-digit account
number and click the [OK] button.
To delete a registered account number, select the
account number in the box and click the [Delete] button.
■ Using the SHARP PPD Utility
Before using the printer auditing mode or the job retention function with password from a Macintosh computer, you
must use the PPD Utility to register account numbers and passwords. The PPD Utility is installed together with the
PPD files using the installer for Macintosh contained in the SHARP PS3 Expansion Kit AR-PK1 PRINTER UTILITIES
CD-ROM.
This utility allows up to 20 account numbers to be registered for the computer. The account numbers are the same
as those for the copier auditing mode and must be registered using one of the key operator programs for the copier
feature. When printing in the auditing mode, one of the registered account numbers must be specified on the screen
used for setting print conditions. Also use this utility to change the registered account numbers.
When using the job retention function with password, a password must be specify when printing. This utility allows up
to 20 passwords to be registered. One of the passwords must be specified when you set the print conditions.
To start this utility, select SHARP AR-PK1 Extras folder and then double click the PPD Utility icon.
NOTE
Do not use the AR230_270 PPD Utility. This utility is not for this model.
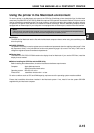
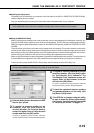
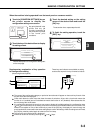
3
To register a security password for the job
retention function, click the [Add] button
for Confidential Print Password. The
Confidential Print Password screen will
appear. Enter a 5-digit number in the box
and click the [OK] button.
To delete a registered security password, select the
password in the box and click the [Delete] button.
4
To save the registered account numbers
and passwords and to exit the utility, click
the [Save & Quit] button.
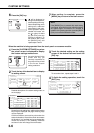
5
If the PPD file is changed using this utility,
be sure to select the printer again through
the Chooser. Use the procedure described
in “Selecting the Printer” on page 2-17.
USING THE MACHINE AS A POSTSCRIPT PRINTER