


3.3 Setting of the hardware configuration 3 Tests and Diagnostics
3.3 Setting of the hardware configuration
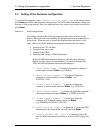
To execute this program, select 2-Repair initial config set in the startup menu,
press Enter and follow the directions on the screen. The H/W initial information setting tool
consists of following subtests. Move the highlight bar to the subtest you want to execute and
press Enter.
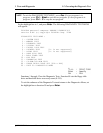
Subtest 01 Initial configuration
This subtest executes the following items and shows their contents in the
display. When an item ends normally, the program proceeds automatically to
the next one. When an error is found, the program stops and waits for key
input. (After solving the problem, the program executes the item again.)
• Setting of the CPU set table
• Setting of the micro code
• Setting of the EHSS
• Inputting and writing of DMI information
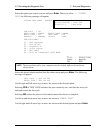
When the DMI information is displayed, the following messages
appear in order. Input each information. (If you do not replace the
PCB, the DMI information should not be changed.)
1. “Enter Model Name ?” is displayed. Input the computer’s
model name and press Enter. (e.g. Satellite)
2. “Enter Version Number ?” is displayed. Input the
computer’s version number and press Enter. (e.g.
PC18070C313S)
3. “Enter Serial Number ?” is displayed. Input the
computer’s serial number and press Enter. (e.g. 12345678)
4. “Enter Model Number ?” is displayed. Input the computer’s
sales model number and press Enter. (e.g. PP200-AAAAA)
5. “Enter Bundle Number ?” is displayed. Input the
computer’s PCN/Bundle number and press Enter.
(e.g. PMSREQ3Q34H/S0123456789)
6. “Write data OK (Y/N) ?” is displayed. To write the DMI
information to the Flash ROM, press Y, and then Enter.
7. “Create DMIINFO TXT (Y/N) ?” is displayed. Press Y,
then the DMI information (text data) is written to the Floppy disk,
etc.
3-8 QOSMIO F10 Maintenance Manual (960-498)