


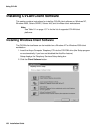

Installing CVLAN Client Software
Issue 1 October 2003 143
Note:
Note: Solaris File Manager users may find it more convenient to access the CD-
ROM by double-clicking on the cvlanxl icon in the File Manager’s /cdrom
folder.
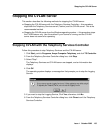
4. At the command prompt, enter the pkgadd command.
The pkgadd command format is as follows:
pkgadd -d /cdrom/cdrom0/client/cvlan/solx86/cvlanxcl.spl
Note:
Note: For a detailed description of the pkgadd command, refer to your Solaris x86
documentation.
The system now displays a list of the packages.
5. Select the cvlanxcl package.
6. Type q to quit the pkgadd command.
The installation is complete.
7. Type eject to eject the CD-ROM from the CD-ROM drive.
After installation has been completed, asaidll.lib, header files and some utilities will
have been installed.
Once you have completed the CVLAN installation, refer to the Avaya Computer Telephony
CVLAN Programmer’s Reference (CALLVISR.PDF) for more information, as follows:
● The utilities (itt, asai_test and perf) are described in Chapter 10
● Instructions for developing CVLAN applications are provided in Chapter 6
Verifying Solaris x86 Client Software Installation
1. At the command prompt, run "asai_test -m <server><link number>" where <server> is
the name or IP address of the CVLAN server and <link number> is the number of the
link on that server.
2. It should respond with a "successful" message.
If it fails, check the TCP connectivity with ping, and the server link status by using the
DEFINITY G3PD Administrator utility.
For information about using the Link Status command, see "Link Status Command" in
chapter 3 of the Avaya Computer Telephony G3 PBX Driver and CVLAN
Administration and Maintenance (DEFNETM.PDF).