


14-7
Cisco 10000 Series Router Software Configuration Guide
OL-2226-23
Chapter 14 Configuring Automatic Protection Switching
Multirouter Automatic Protection Switching
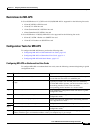
Configuring MR-APS with Static Routes on Channelized Line Cards
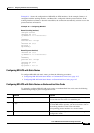
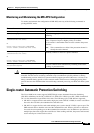
To optionally configure MR-APS with static routes on channelized line cards, enter the following
commands beginning in global configuration mode:
Command Purpose
Step 1
Router(config)# redundancy
Enters redundancy configuration mode, which allows you
to associate two line cards as a redundant pair.
Step 2
Router(config-r)# associate slot slot-one
mr-aps
Logically associates slots for APS processor redundancy.
To allow MR-APS to operate, you must associate a slot on
the working interface of one router and with a
corresponding protect interface on a second router.
Step 3
Router(config-r)# exit
Exits redundancy configuration mode and returns to global
configuration mode.
Step 4
Router(config)# ip route prefix mask
{ip-address | interface-type interface-number
[ip-address]} [distance] [name] [permanent]
[tag tag]
Configures a static IP address.
When configuring APS, we recommend that you specify the
optional IP address of the interface to improve routing
performance.
Step 5
Router(config)# controller SONET
slot#/subslot#/port#
Specifies the interface type and number. Enters controller
configuration mode.
Step 6
Router(config-controller)# ip route static
update immediate
(Optional) Specifies that static routes will be added to the
routing table immediately after the interface becomes
active.
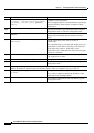
Step 7
Router(config-controller)# carrier-delay
[seconds | msec seconds]
Sets the carrier delay timer value in seconds or
milliseconds.
This command allows you to filter link outages and to not
report them as a link down event if they occur before the
carrier delay timer expires. In MR-APS, system
performance can be enhanced if link-down event messages
are kept to a minimum.
Step 8
Router(config-controller)# aps group
group-number
Permits more than one APS protect and working interface
to be supported on a router.
Step 9
Router(config-controller)# aps working
circuit-number
Configures an interface as a working interface.
Step 10
Router(config-controller)# exit
Exits controller configuration mode and returns to global
configuration mode.
Step 11
Repeat steps 1 through 8 on the second router to configure the protect interface. Substitute the appropriate slot
numbers, IP addresses, interface types, and interface numbers. After you complete step 8, go to step 12.
Step 12
Router(config-controller)# aps protect
circuit-number ip-address
Configures an interface as a protect interface.
The ip-address argument specifies the IP address of the
router that has the working interface.
Step 13
Router(config-controller)# exit
Exits controller configuration mode and returns to global
configuration mode.