


Configuring the GbE Interconnect Switch Using the Web-Based Management Interface
Compaq ProLiant BL p-Class GbE Interconnect Switch User Guide 4-21
COMPAQ CONFIDENTIAL Codename: Vanilla Part Number: 263680-001 Last Saved On: 4/23/02 10:02 AM
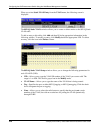
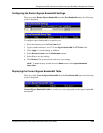
• Egress—Allows you to select the radio button to specify that the port is a static member
of the VLAN. Egress member ports transmit traffic for the VLAN.
• Forbidden—Specifies the port as not being a member of the VLAN and that the port is
forbidden from dynamically becoming a member of the VLAN.
NOTE: Characteristics of DEFAULT_VLAN include:
• DEFAULT_VLAN is an IEEE 802.1Q Static VLAN with VID equal to 1.
• DEFAULT_VLAN cannot be deleted.
• The VID cannot be changed. The VID that is equal to 1 is reserved for DEFAULT_VLAN.
• The VLAN name can be changed to any other valid VLAN name.
• You cannot delete a port from DEFAULT_VLAN, unless it is a member of another 802.1Q VLAN.
• You cannot forbid a port from DEFAULT_VLAN, unless it is a member of another 802.1Q VLAN.
• If a port is deleted from the only 802.1Q VLAN of which it is a member, then it will automatically
become a member of DEFAULT_VLAN as an untagged, egress port.
• If a port is assigned to a user-created 802.1Q VLAN, and is not a tagged egress port member of
DEFAULT_VLAN (in other words, it is an untagged egress port), then it will be deleted
automatically from DEFAULT_VLAN.
• A tagged egress port of DEFAULT_VLAN will not be deleted from DEFAULT_VLAN, when it is
assigned to another user-created 802.1Q VLAN.
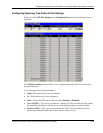
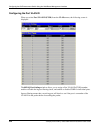
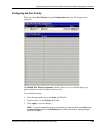
To configure an 802.1Q static VLAN entry:
1. Type the VLAN ID in the VID field.
2. Type the VLAN name in the VLAN Name field.
3. Select Tag if you want a member port to be a tagging port. Leave it unselected if you do
not want it to be a tagging port.
4. Click None if you do not want a port to belong to the VLAN, or click Egress to statically
set a port to belong to a VLAN.
5. Click Apply to let the changes take effect.
NOTE: To save the configuration settings permanently, you must enter them into NVRAM using
the Save Changes option on the Maintenance menu. Refer to the section, “Saving Changes,”
earlier in this chapter.