


322 Printing
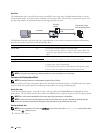
The front USB port of the printer is designed for USB 2.0 devices. You must use only an authorized USB memory
with an A plug type connector. Use only a metal shielded USB memory.
Supported File Formats
Files in the following file formats can be printed directly from a USB memory.
•PDF
•TIFF
•JPEG
Inserting and Removing a USB Memory
You can insert the USB memory before printing or scanning images.
Before removing the USB memory, ensure that the printer is not accessing the USB memory.
CAUTION: If you remove the USB memory while the printer is accessing, the data in the USB memory or the USB memory
device itself may be destroyed.
Printing a File in a USB Memory
1
Press the
(Home)
button.
2
Insert a USB memory to the front USB port of the printer.
For details about inserting a USB memory, see "Inserting and Removing a USB Memory."
NOTE: If the USB Drive Detected screen appears, select USB Direct Print, and proceed to step 5.
3
Select
Print Menu
.
4
Select
USB Direct Print
.
5
Select until the desired file appears, and then select that file.
NOTE: Only the following characters are displayed on the touch panel:
A B C D E F G H I J K L M N O P Q R S T U V W X Y Z 0 1 2 3 4 5 6 7 8 9 $ % ’ ‘ - @ {} ~ ! # ( ) & _ ^
6
Select
OK
.
7
Specify print options such as
Output Color
,
Select Tray
,
2 Sided Printing
,
Multiple-Up
,
Collation
, and
PDF Password
on the
USB Direct Print
and
Options
tabs. For details, see "USB Direct Print
Menu."
8
Press the
(Start)
button to begin printing.
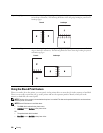
A plug type