


380 Faxing
3
Select
Fax
.
4
Adjust the document resolution to suit your fax needs. (For details, see "Adjusting the Document Resolution." For
adjusting the contrast, see "Adjusting the Document Contrast.")
5
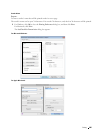
To select a fax number, do one of the followings :
• Select , and then select one of the following:
Machine Address Book - Individuals
- Select an individual fax number and then select
OK
.
Machine Address Book - Groups
- Select a group dial number and then select
OK
.
Search Network Address Book
- Search and select a fax number from the LDAP server and then
select
OK
.
NOTE: For more information on address book and server address book, see "Address Books."
NOTE: For details about Search Network Address Book, see "Using the Server Address Book and Server
Phone Book."
NOTE: The fax number needs to be registered before you can select Address Book.
• Select .
Enter the speed dial number using the number pad, and then select .
6
Press the
(Start)
button to scan data.
When the document is loaded on the document glass, the display prompts you for another page.
If you want to place a new document, replace the document with a new document, and then press the
(Start)
button.
When you have finished loading documents, select
Send Now
.
The printer starts dialing the number, and then sends the fax when the remote fax machine is ready.
NOTE: You can cancel the fax job at any time while sending the fax by pressing the
(Cancel) button.
NOTE: Pressing the
(Start)
button
does not start sending a fax when the available time is set or the Fax function is
locked. (For details, see "Set Available Time" for the Available time and "Function Enabled" for the Fax function.)
Sending a Fax Manually
1
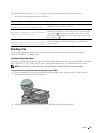
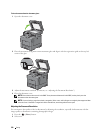
Load the document(s) facing up with top edge in first into the DADF.
OR
Place a single document facing down on the document glass, and close the document cover.
For details about loading a document, see "Loading an Original Document."
2
Press the
(Home)
button.
3
Select
Fax
.
4
Adjust the document resolution to suit your fax needs. (For details, see "Adjusting the Document Resolution." For
adjusting the contrast, see "Adjusting the Document Contrast.")
5
Select
On Hook
.
6
Enter the fax number of the recipient using the number pad.
You can also select the recipient by using speed dial number or address book. (For details, see "Automatic
Redialing.")
7
Press the
(Start)
button to begin sending the fax.
NOTE: You can cancel the fax job at any time while sending the fax by pressing the
(Cancel) button.