


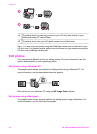

2 Connect the HP JetDirect to the USB port on the rear of your HP all-in-one.
3 Do one of the following:
– If you are performing an initial installation of your HP all-in-one, make sure
you insert the HP all-in-one installation CD into the CD-ROM drive on your
computer and run the HP all-in-one setup wizard.
The network support software for your computer is installed at this time.
When the installation is finished, the HP All-in-One Setup Assistant
appears on your computer.
– From the Disk Drive, open the HP All-in-One Setup Assistant from the
following location: Applications:Hewlett-Packard:HP Photo & Imaging
Software:HP AiO Software
The HP All-in-One Setup Assistant appears on your computer.
4 Follow the onscreen prompts and provide the information requested.
Note Make sure you click TCP/IP Network on the connection screen.
Use Webscan
Webscan lets you perform a basic scan through the HP JetDirect 175x using just a
Web browser. It also lets you perform the scan from your HP all-in-one without the
device software installed on your computer. Just enter the IP address of the
HP JetDirect in a Web browser and access the HP JetDirect embedded Web server
and Webscan.
The user interface for Webscan is unique to using the HP JetDirect and does not
support scan-to destinations like the HP Image Zone scanning software. The e-mail
functionality of Webscan is limited, so it is recommended you use the HP Image Zone
scanning software if you are not connected using the HP JetDirect.
To use Webscan
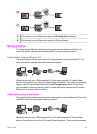
1 Briefly press and release the test button on the rear of the HP JetDirect 175x.
The HP JetDirect network configuration page prints on the HP all-in-one.
2 Enter the IP address of the HP JetDirect (obtained from the network configuration
page) in a Web browser on your computer.
The HP JetDirect Web server opens in the browser window.
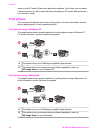
3 Select Scan.
4 Follow the onscreen instructions.
Chapter 3
20 HP Officejet 6200 series all-in-one