


http://h18004.www1.hp.com/products/servers/proliantstorage/bcs-rackandpower/information_library.html
WARNING! Ensure that all anti tip features are employed (front and rear anti tip feet installed;
adequate ballast properly placed; and so on) are employed prior to extending the server from
the rack.
Extending the Server from the Rack
NOTE: Ensure that there is enough area (approximately 1.5 meters [4.5 ft.]) to fully extend the
server from the front of the rack.
To extend the server from the rack, follow these steps:
1. Remove the T25 screws with the orange tags that fasten the front of the server to the rack
(Figure 6-1).
2. Remove the large orange screws from the rear of the rack located on the left and right server
slide rails. The server will not slide forward if these screws are not removed.
3. Flip out the two pull handles located on both ends of the front bezel (Figure 6-1).
4. Slowly pull the server forward by the handles until it is fully extended.
NOTE: The server is fully extended when the rail clips are locked in place and the top
cover is completely accessible.
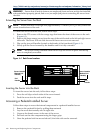
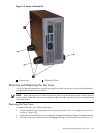
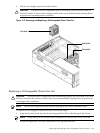
Figure 6-1 Rack Screw Locations
Pull
Handle
Screw Location
(Behind Pull
Handle)
Pull
Handle
Screw Locatio
n
(Behind Pull
Handle)
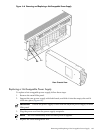
Inserting the Server into the Rack
To insert the server into the rack, follow these steps:
1. Press the rail clips on both sides of the server inward.
2. Push the server into the rack until it stops.
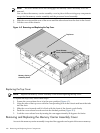
Accessing a Pedestal-Installed Server
Follow these steps to access the internal components in a pedestal installed server.
1. Remove the pedestal kit feet by pulling them outward
2. Lay the server horizontally onto its right side.
3. Unscrew the thumb screws in the rear of the server.
4. Pull back on the side component using the finger grips.
5. Once the pedestal side has moved about 1/4 inch the side can be removed.
180 Removing and Replacing Server Components