


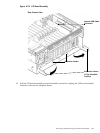
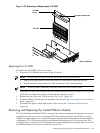
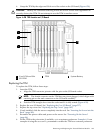
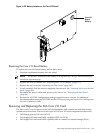

6. Grasp the TPM by the edges and lift it out of the socket on the I/O board (Figure 6-28).
CAUTION: Destroy the TPM after removing it from the server. Follow local regulations to
securely destroy the TPM. Do not attempt to use the TPM in another server.
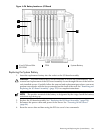
Figure 6-28 TPM Location on I/O Board
1
2
3
4
431
Core I/O Board Slot System BatteryTPM
2
I/O VRM
Replacing the TPM
To replace the TPM, follow these steps:
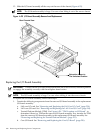
1. Insert the TPM.
a. Align the TPM connector pinouts with the pins on the I/O board socket.
NOTE: The female connector on the TPM has one pinout plugged, which aligns with
a missing pin on the male connector on the I/O board assembly.
b. Push the TPM straight down into the socket until it is fully seated (Figure 6-28).
2. Replace the core I/O board. See “Replacing the Core I/O Board” (page 237).
3. Replace the top cover. See “Replacing the Top Cover” (page 182).
4. If rack installed, slide the server completely into the rack. See “Inserting the Server into the
Rack” (page 180).
5. Reconnect the power cables and power on the server. See “Powering On the Server”
(page 94).
6. Set the TPM to the prior state, if available, or to a customer preference. Example 6-1 is an
example of using the secconfig command to enable the TPM as a customer preference.
Removing and Replacing the Trusted Platform Module 235