


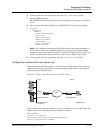

Configuring IPX Routing
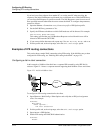
Configuring IPX routing connections
MAX 6000/3000 Network Configuration Guide 12-15
(If the MAX needs to support multiple IPX frame types, you must also enable bridging in
the Answer > PPP Options profile.)
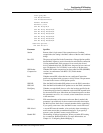
4 Open the Connection profile for Site B.
In this example, the Connection profile for Site B is profile #5. A profile’s number is the
unique part of the number you assign in the Connections menu. For example, the
Connection profile defined as 90-105 is #5.
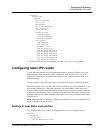
5 Set up the Connection profile as follows:
Ethernet
Connections
90-105 #5
Station=SITEBGW
Active=Yes
Encaps=MPP
PRI # Type=National
Dial #=555-1212
Route IPX=Yes
Encaps options...
Send Auth=CHAP
Recv PW=hello
Send PW=*SECURE*
IPX options...
IPX RIP=None
IPX SAP=Both
NetWare t/o=30
SAP HS Proxy=N/A
SAP HS Proxy Net#1=N/A
SAP HS Proxy Net#2=N/A
SAP HS Proxy Net#3=N/A
SAP HS Proxy Net#4=N/A
SAP HS Proxy Net#5=N/A
SAP HS Proxy Net#6=N/A
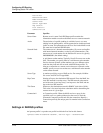
Following is a comparable RADIUS profile:
SITEBGW Password = “hello”
Service-Type = Framed-User,
Framed-Protocol = MPP,
Ascend-Route-IPX = Route-IPX-Yes,
Ascend-IPX-Peer-Mode = IPX-Peer-Router
6 Exit the profile and, at the exit prompt, select the exit and accept option.
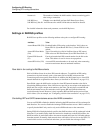
7 Open an IPX Route profile.
8 Set IPX RIP to None in the Connection profile, and configure a static route to the remote
server.
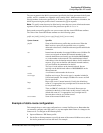
9 Set up a route to the remote NetWare server (SERVER-2). Use the following settings:
Ethernet
IPX Routes
IPX Routes profile
Server Name=SERVER-2
Active=Yes
Network=013DE888
Node=000000000001
Socket=0451