


12-18 MAX 6000/3000 Network Configuration Guide
Configuring IPX Routing
Configuring IPX routing connections
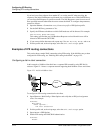
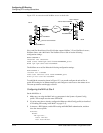
Site B is a home office that consists of one PC and a Lucent Pipeline unit. It is not an existing
Novell LAN, so the Pipeline unit’s configuration creates a new IPX network (1000CFFF, for
example).
Note: The new IPX network number assigned to Site B in this example cannot be in use
anywhere on the entire IPX Wide Area Network. That is, it cannot be in use at Site A or any
network that connects to Site A.
This example assumes that the Ethernet > Mod Config > Ether Options profile and Ethernet >
Answer > PPP Options and Session Options subprofiles have already been set up to enable
IPX routing. The initial connection between the two units should be manually dialed (using the
DO menu) because you do not use static routes.
To configure the MAX at Site A
On the MAX at Site A:
1 Assign the MAX a system name in the System > Sys Config profile. This example uses
the name SITEAGW.
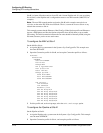
2 Open the Connection profile for Site B, and set up the Connection profile as follows:
Ethernet
Connections
SITEBGW
Station=SITEBGW
Active=Yes
Encaps=MPP
PRI # Type=National
Dial #=555-1212
Route IPX=Yes
Encaps options...
Send Auth=CHAP
Recv PW=*SECURE*
Send PW=*SECURE*
IPX options...
IPX RIP=Both
IPX SAP=Both
NetWare t/o=30
SAP HS Proxy=N/A
SAP HS Proxy Net#1=N/A
SAP HS Proxy Net#2=N/A
SAP HS Proxy Net#3=N/A
SAP HS Proxy Net#4=N/A
SAP HS Proxy Net#5=N/A
SAP HS Proxy Net#6=N/A
3 Exit the profile and, at the exit prompt, select the exit and accept option.
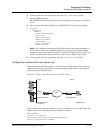
To configure the Pipeline at Site B
On the Pipeline at Site B:
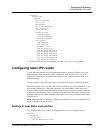
1 Assign the Pipeline unit a system name in the System > Sys Config profile. This example
uses the name SITEBGW.
2 Open the Connection profile for Site A, and set up the profile as follows: