


Configuring IPX Routing
Configuring IPX routing connections
MAX 6000/3000 Network Configuration Guide 12-17
6 Exit the profile and, at the exit prompt, select the exit and accept option.
7 Open an IPX Route profile.
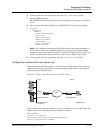
Set IPX RIP to None in the Connection profile, and configure a static route to the remote
server.
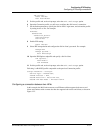
8 Set up a route to the remote NetWare server (SERVER-1). Use the following settings:
Ethernet
IPX Routes
SERVER-1
Server Name=SERVER-1
Active=Yes
Network=CFC12345
Node=000000000001
Socket=0451
Server Type=0004
Connection #=2
Note: The Connection # parameter in the IPX Route profile must match the number of
the Connection profile you configured for that site. If you specify the internal network
number of a server, make sure you specify values for Server Name and Server Type. If you
specify an external network, do not specify a value for Server Name or Server Type.
9 Exit the profile and, at the exit prompt, select the exit and accept option.
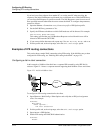
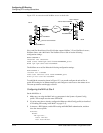
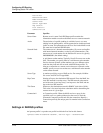
Configuring a connection with local servers only
In this example, the MAX unit connects to a local IPX network that supports both servers and
clients, and connects to a geographically remote network that supports one or more NetWare
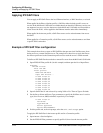
clients. Figure 12-3 shows the setup.
Figure 12-3. A dial-in client that belongs to its own IPX network
In this example, Site A supports NetWare 3.12 servers, NetWare clients, and a MAX unit. The
NetWare server at Site A has the following configuration settings:
Name=SERVER-1
internal net CFC12345
Load 3c509 name=ipx-card frame=ETHERNET_8023
Bind ipx ipx-card net=1234ABCD
Site A
Site B
NetWare client
NET=1234ABCD
Ethernet
NetWare servers
and clients
MAX
MAX
Net=1000CFFF