


Oct 02
Oki B6100 User Guide 9-19
Moving the Offset Catch Tray
Moving the Offset Catch Tray
Moving the Offset Catch Tray a Short Distance
Use the following procedure to move the offset catch tray a short distance:
1. Turn the printer off by pressing the [ O ] on the power switch on the right side of the
printer.
2. Disconnect the plug of the AC power cord from the AC wall outlet.
3. Disconnect the printer from the host computer.
4. Wait 30 minutes for the printer to cool before moving the printer.
5. Remove the toner cartridge and cover it with an opaque plastic sheet.
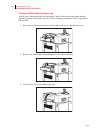
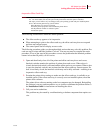
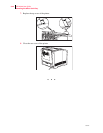
6. With the help of another person, grasp the recessed areas on the bottom of the printer and
lift the printer. Carefully carry the printer to the new location.
7. Once the printer and offset catch tray are in the new location, refer to the printer Installa-
tion Guide included in the original packaging to reinstall the printer.
Moving the Offset Catch Tray a Long Distance
1. Turn the printer off by pressing the [ O ] on the power switch on the right side of the
printer.
2. Disconnect the plug of the AC power cord from the AC wall outlet, and disconnect the AC
power cord from the printer.
3. Disconnect the printer from the host computer.
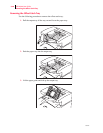
4. Fold the output paper tray into the offset catch tray.
5. Remove the offset catch tray off of the printer. Refer to “Removing the Offset Catch Tray”
on page 9-20 for complete instructions.
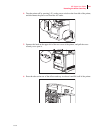
6. Remove the offset catch tray cover from the top rear of the printer and replace it with the
original printer cover.
7. Repack the offset catch tray components in the original packaging.
8. Once the offset catch tray is in the new location, refer to “Installing the Offset Catch Tray”
on page 9-4.