


Preparing the NIC and the Computer 33
2 Make sure that cable requirements are met.
The RJ-45 port provides a 10 Mbps or 100 Mbps
connection automatically, depending on the speed of
the connected hub or switch.
The following table shows the cable requirements and
maximum network cable lengths for the RJ-45 port.
3 Unpack and inspect the NIC for damage.
4 Exit all open applications and user processes.
5 Turn off the power to the computer and attached
devices.
6 Unplug the power cables from the power source.
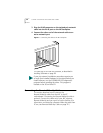
7 Remove the computer cover.
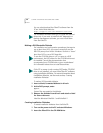
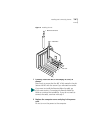
8 Locate an empty, nonshared bus-mastering PCI slot
and remove its slot cover. Save the screw, if there
is one.
Do not install the NIC in a shared PCI slot. Avoid any
PCI slot next to an ISA slot. This is often a shared slot and
does not support bus mastering.
If you do not know how to identify a PCI slot, check the
computer documentation or ask the system administrator.
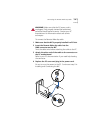
If you are planning to install the Remote Wake-Up cable,
choose an empty PCI slot that is close to the Remote
Wake-Up connector on the computer motherboard. The
Remote Wake-Up cable is only required if the computer
complies with PCI 2.1 and you want to use the
Remote Wake-Up. The cable is not required if the
computer complies with PCI 2.2. (For information on
obtaining a Remote Wake-Up cable from 3Com, see
Remote Wake-Up Cable on page 22.)
Network Envi-
ronment
Cable Required
Maximum
Cable Length
10 Mbps
(10BASE-T)
Category 3, 4, or 5
unshielded twisted-pair
100 m (328 ft)
100 Mbps
(100BASE-TX)
Category 5 unshielded
twisted-pair
100 m (328 ft)