


Installing the Network Driver Using the EtherCD 41
3 Click Next.
The Install Hardware Device Drivers screen appears.
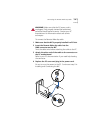
4 Insert the EtherCD in the CD-ROM drive.
5 Select Search for a suitable driver for my device
(recommended), and then click Next.
The Locate Driver Files screen appears.
6 Select the CD-ROM drives option, clear any other
checked options, and click Next.
The Driver Files Search Results screen appears.
Windows finds the driver on the EtherCD.
7 Click Next.
The Hardware Install screen appears. Files are copied. Then
the Complete the Found New Hardware Wizard screen
appears, displaying the message “Windows has finished
installing the software for this device.”
8 Click Finish.
The software installation is complete. Go to Verifying
Successful Installation on page 48 to confirm that the NIC
is properly installed.
To change configuration settings, see Configuring the NIC
on page 113.
Windows NT 4.0
This section describes how to install the network driver and
NIC software in a PC or server running Windows NT 4.0
.
To install the network driver:
1 Turn on the power to the PC and start Windows NT.
2 Log in to the Windows NT Administrator account.
3 Insert the EtherCD in the CD-ROM drive.
4 Right-click the Network Neighborhood icon.
CAUTION: Windows NT 4.0 Service Pack 6 (SP6) is a
minimum system requirement for installing 3Com
DynamicAccess technology.