


Configuring the Falcon
2-18
Falcon
®
4400 Series with Windows
®
CE
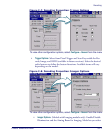
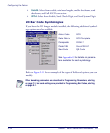
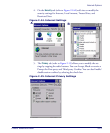
4. A File Save message showing the
image file name will appear,
unless that option has been pre-
viously deselected in the
File set-
tings (in that case, the file will
automatically save without
prompting). See "Image File" on
page 2-18, to change settings.
5. Tap
Yes to save the image, or No
to discard it.
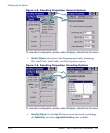
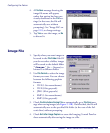
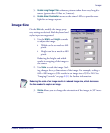
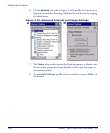
Image File
1. Specify where you want images to
be saved in the
File Folder field. If
you do not select a folder, images
will be saved to the default folder
“\Images.” Use
… (browse) to
browse to a different folder.
2. Use
File Format to select the image
format you want. You can choose
between the following graphics
formats:
• TIFF (1-bit monochrome)
• TIFF (8-bit grayscale)
• JPEG (8-bit grayscale)
• BMP (1-bit monochrome)
• BMP (8-bit grayscale)
3. Check
Confirm before Saving File to automatically get a File Save mes-
sage when saving images (see Figure 2-12B). If unchecked, the file will
automatically save to the specified file folder (at the root of the Fal-
con’s drive) without prompting.
4. Check
Exit after Image Capture to cause the Imaging Control Panel to
close automatically after saving the image to a file.