


Chapter 16 Clock Control Unit Replacement 16-7
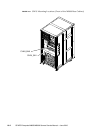
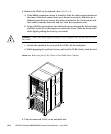
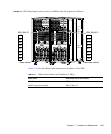
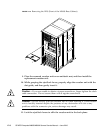
10. Mount the replacement CLKU by following the removal instructions in Step 8
in reverse order. Align the CLKU with the slot guides, insert it carefully, and
secure it firmly.
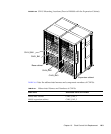
Push the eject/lock levers as far as they will go, and then push the knob screws
on the right and left eject/lock levers to lock them in position. If the knob screws
remain in position, the clock control unit is securely mounted.
Note – Use a torque screwdriver to secure the clock cable connector with the torque
of 0.2N*m (2.0kgf*cm).
Caution – If you are unable to obtain a torque screwdriver, finger tighten the clock
cable connectors. Do not secure them with a regular screwdriver.
Caution – Do not forcibly push the CLKU when inserting it, even if it is not moving
smoothly. If the CLKU is forcibly inserted despite the presence of any obstruction in
a slot or any problem with a connector pin, serious damage may result.
11. Switch on all main line switches for the AC section (ACS) in the power supply
system.
12. Confirm that the XSCF STANDBY LED (green) on the operator panel remains
lit. If it is blinking, wait until it remains lit.
13. Start (turn on power) all domains together. Take either of the following two
actions:
■ Press and hold down (for less than four seconds) the POWER switch on the
operator panel.
■ From a console that is connected to XSCF, execute the poweron -a command
of XSCF.
The power to all the domains is turned on, and then the power-on self test (POST)
is executed. When ok prompt displayed on the console of relevant domain, POST
is completed.
For details of the power-on operation, see Section 4.4.2, “Powering the Server On”
on page 4-19, and the SPARC Enterprise M3000/M4000/M5000/M8000/M9000
Servers XSCF User’s Guide.