


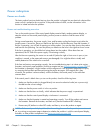

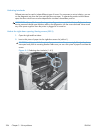
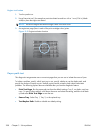

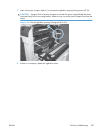


3. Insert a folded piece of paper into the front door switch (callout 2). Wait until the product enters
the Ready state.
NOTE: The paper must be thick enough to depress and hold in place the sensor actuator arm.
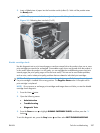
Figure 3-2 Defeating door interlocks (2 of 2)
1
Disable cartridge check
Use this diagnostic test to print internal pages or send an external job to the product when one or more
print cartridges are removed or exchanged. Consumable supply errors are ignored while the product is
in this mode. When the product is in this mode, you can navigate the troubleshooting menus and print
internal pages (the print quality pages will be the most useful). This test can be used isolate problems,
such as noise, and to isolate print-quality problems that are related to individual print cartridges.
NOTE: Cartridges are not keyed and can be interchanged. An error will display on the control panel
if a print cartridge is installed in the wrong position. The Supplies Status menu will explain which
print cartridge is misplaced.
NOTE: Do not remove or exchange print cartridges and image drums until after you start the disable
cartridge check diagnostic.
1. Press the Home button.
2. Open the following menus:
●
Administration
●
Troubleshooting
●
Diagnostic Tests
3. Press the Down arrow
to highlight DISABLE CARTRIDGE CHECK, and then press the OK
button
.
To exit this diagnostic test, press the Stop button
and then select EXIT TROUBLESHOOTING.
ENWW
Tools for troubleshooting
287