


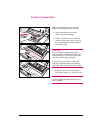
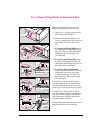
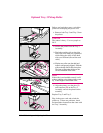


Optional Tray 3 Pickup Roller
Before you begin these steps, switch the
printer off and unplug the power cord.
1 Remove both Tray 2 and Tray 3 from
the printer.
Caution
The printer is heavy. Use two people to
lift it.
2 Lift the the printer from the Tray 3
Assembly.
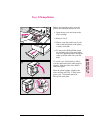
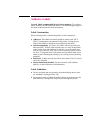
3 Pinch the retaining clip on the right
end of the roller with your right hand
while sliding the roller off the shaft
with your left hand (discard the used
roller).
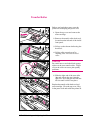
4 Slip the new roller onto the shaft and
rotate it until properly aligned. Slide the
roller to the left until it clicks into place.
The inset on illustration #4 shows the
correct orientation of the roller.
Note
If the roller is not installed correctly it will
make a grinding noise during printer warm
up. If this happens reinstall the roller.
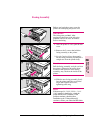
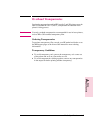
5
Align the printer over the pins (A)
and connector (B) on the Tray 3
Assembly, and set the printer on the
assembly.
Replace Tray 2 and Tray 3.
Plug in the power cord and switch the
printer on. If there are problems, check
the installation instructions that came with
the Tray 3 Assembly.
8-14 Maintaining and Adjusting the Printer EN