


141
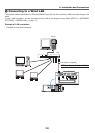
6. Installation and Connections
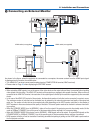
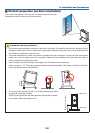
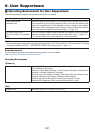
Design and manufacturing conditions for the projector stand
Pleasehireaninstallationserviceprovider(forafee)todesignandmanufactureacustomizedstand.Pleaseensure
thatthedesigncomplieswiththefollowingconditions:
• Thereisoneintakeventoneithersideandoneexhaustventattherear.Theseshouldremainunobstructed.Also,
secureenoughspaceforeasyltercoverremovalforltercleaning.
• Removetheleveladjustersortheprojectorhandlesincasethesehitagainstthestand.Forremovingthelevel
adjuster,rotatetheleveladjusteritself,andforremovingthehandle,removethehandlefasteningscrews.
• Fixthestandontotheceilingmountscrewholes(6positions)ontheprojectorbottomface.
Dimensionsofscrewhole:forM6screwMaximumdepth10mm(Calculatetheboltlengthdependingonthestand
design)
• Horizontaladjustmentmechanism(forexample,boltsandnutsin4places)
• Makesuretodesignthestandnotfallingovereasily.
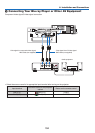
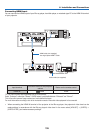
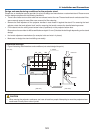
Reference drawings
* Figureillustratingthedimensionsandconditions(notactualdesignblueprint).
150 150 300
140140
[Side View] [Front View]
6 - M6 bolt
(Unit: mm)
Horizontal adjuster
Exhaust vent
Intake vent
Intake vent
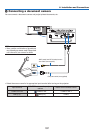
CAUTION
• Whenmovingtheprojector,makesureyouhaveatleastfourpeople.Attemptingtomovetheprojectoralone
couldresultinbackpainorotherinjuries.