Section 7 - Instrument Care and Maintenance
Page 98 09/11/2008 REV 0.99
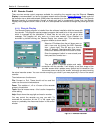
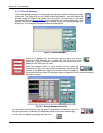
Select the channel to use in the Channel drop down menu box (1, 6, 7 or 12) and select “1 Hz Cal” in the
Calibration Function drop down menu box. The Range does not matter. Press the “Set Chan” button. A
“Channel has been set successfully” popup will appear. Press “OK” in the top right corner
Apply a calibrated 1 Hz signal (0 to 5V signal typical) into the channel selected above with the positive signal
going to Fin and the ground to COM (See Section 2.4.3.6 for connection detail). Press the “Calibrate” button. On
completion of the step you will get a “Calibration Function OK" popup dialog. Press “OK” in the top right corner.
Select “Store Cal” from the “Calibration Function” drop down menu and press the “Calibrate” button. Accept the
“Calibration Function OK” popup dialog.
In the event that you corrupt or adversely affect the calibration, you can repeat it checking your input sources or
as a last resort restore the known good factory calibration by pressing the “Restore” button.
Go to Table of Contents


