


Section 5 – Recorder Setup
Page 63 09/11/2008 REV 0.99
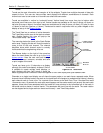
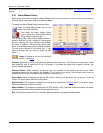
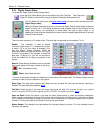
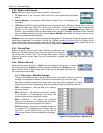
Figure 5-5-1 Digital Output Setup
5.5.1 Digital Output Setup
To access the Digital Output Setup dialog window:
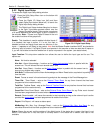
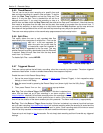
Press the Utility Setup Menu icon on the bottom left of the Task Bar. Then Press the
Digital I/O Setup icon which will bring up the digital IO selection dialog shown left.
The Top Button will take you to the Digital Input setup; the lower button will take you to the
Digital Output setup.
Select the Digital Output setup button to launch the Digital Output Setup dialog window as
shown in Figure 5-5-1. This dialog window provides complete control over the setup of the
digital relay outputs. No assumption is made about the type of relay output or its
capabilities; these must be checked by the user from the hardware specifications of the card
installed in the recorder.
There can be a maximum of 12 output relays. The scroll bar can be used to view contacts 7 to 12.
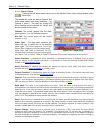
Enable: This checkbox is used to enable
individual output relays. If it is checked, the output
is active, if it is not, the output is disabled. Note
that the Master Enable checkbox MUST be
checked to allow any output to function. If a Digital
IO card is not present in the recorder or there are
less than 12 relays on it, you will not be able to
check the enable box of relays not present in the
system.
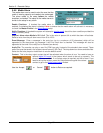
Manual: These buttons enable the user to override
the current status of the relay outputs in real time.
Set – activates the relay
Reset - deactivates the relay.
The icon on the button changes to indicate the current status of the output relay. The Master Enable must be
checked in order for this to operate on the outputs.
Relay Type: This drop down selection box allows the user to define the relay type as Normal, Latching or
Reflash. The descriptions are detailed above.
Fail Safe: Check this box if you want this output relay to be fail safe. This reverses the logic so a contact
which is normally OPEN will be energized normally CLOSED. Full details are shown above.
Open on Reset: Check this option if you want the Alarm Reset button to reset the contacts irrespective.
Under normal circumstances a contact will not drop out until the alarm condition clears. If the Open on Reset
box is checked, the contact will drop out when the Alarm Reset button is pressed irrespective of the alarm
condition. This may be useful if the contact is used as an alarm klaxon.
Master Enable: This checkbox must be checked for the output relays to function. If it is not checked, none of
the relays will operate.