Appendices Page 269
Appendix E - Configuring TCP/IP Settings
The following steps describe how to configure the Management Station TCP/IP settings in order to
initially contact the SonicWALL. It is assumed that the Management Station can access the Internet
through an existing connection.
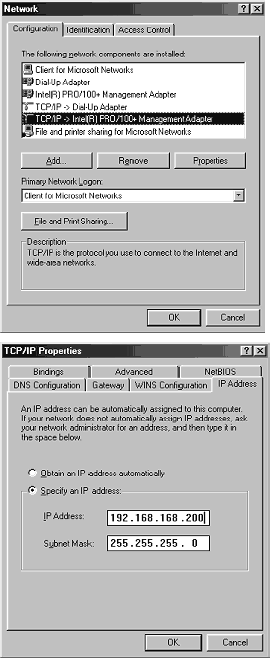
The SonicWALL is pre-configured with the IP address “192.168.168.168". During the initial
configuration, it is necessary to temporarily change the IP address of the Management Station to
one in the same subnet as the SonicWALL. For initial configuration, set the IP address of the
Management Station to "192.168.168.200".
Make a note of the Management Station's current TCP/IP settings. If the Management Station
accesses the Internet through an existing broadband connection, then the TCP/IP settings can be
helpful when configuring the IP settings of the SonicWALL.
Windows 98
1. From the Start list, highlight Settings and then select Control Panel.
2.Double-click the Network icon in the Control Panel window.
3.Double-click TCP/IP in the TCP/IP Properties window.
4.Select the Specify an IP Address radio button.
5.Enter "192.168.168.200" in the IP Address field.
6.Enter "255.255.255.0" in the Subnet Mask field.
7.Click DNS Configuration.
8.Enter the DNS IP address in the Preferred DNS Server field.
If you have more than one address, enter the second one in
the Alternate DNS server field.
9.Click OK, and then click OK again.
10.Restart the computer for changes to take effect.
