


Section 2: Installation and Setup
2-8 RPMSP & CSP70-D100U User’s Manual
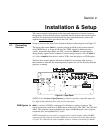
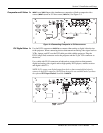
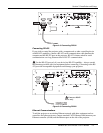
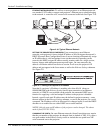
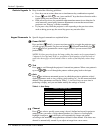
ETHERNET NETWORK SETUP: To add one or more projectors to an Ethernet network,
use standard CAT5 cable to connect each projector’s Ethernet port to a hub belonging
to the network. A controller or PC must also be connected to the hub. See Figure 2.10.
Figure 2.10. Typical Ethernet Network
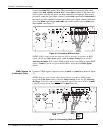
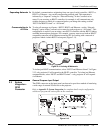
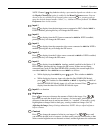
SETTING THE PROJECTOR’S IP ADDRESS: Upon connection to most Ethernet
networks, each projector’s factory default IP address of 0.0.0.0 triggers the network’s
DHCP (Dynamic Host Configuration Protocol) server function to automatically assign
an IP address that is valid and unique for use on that network. Depending on the
network, this DHCP-assigned IP address usually remains stable for a single session,
but may change with subsequent power-ups and logins. On some networks, the
address will remain stable from session to session. In all cases, the projector’s IP
address and port appear in the Status menu as well as the Ethernet Settings submenu.
See Figure 2.11
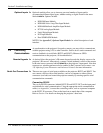
Figure 2.11. Setting the Projector’s IP Address
Note that if a projector’s IP address is anything other than 0.0.0.0 (shown as
000.000.000.000 in the Ethernet Settings menu) upon connection to an Ethernet
network, or if DHCP is not available on the network, the automatic DHCP server
function for supplying a valid and unique IP address to the projector is disabled.
Instead, a specific and static IP address must be defined in projector memory—enter
the new address in the Ethernet Settings submenu, or send to the projector via a serial
command. The IP address will be in effect until it is changed again, or until the DHCP
checkbox is re-enabled for use with a DHCP server on the network.
NOTES: Only the port and IP address of the projector can be changed. The subnet
mask is fixed (255.255.255.0).
CHANGING THE PORT#: On some Ethernet networks, firewall restrictions may require
that the port number of the projector be changed from its default of 3002. If so, enter a
new port number in the Ethernet Settings menu or include the new port# in an XIP
serial command sent to the projector.