


Section 3: Operation
3-2 RPMSP & CSP70-D100U User’s Manual
The DLM is designed to remain in a horizontal position and does not get
rotated 90° like the PHM when the configuration of the projector is changed.
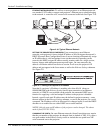
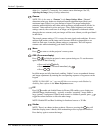
AC RECEPTACLE - Connect the appropriately rated line cord supplied with the
projector to the AC receptacle on the DLM. Before unplugging a projector,
allow the cooling fans to turn off.
LAMPS - Two, 100W UHP lamps are housed in this module and are
accessible by opening the lamp doors located at the top. Before replacing a
lamp, read the procedure and safety and warning guidelines provided in
Section 5.
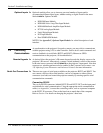
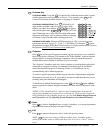
Electronics Module (EM)
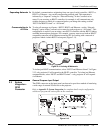
The EM module contains the main electronics and input connectors of the projector. It
is vertically mounted to the tray using a separate mounting bracket. Also located on
this module are two, 7-segment windows. The projector’s status and any 2-digit error
code will be displayed in this window. In addition to the numeric readout, there are
two decimal points in the display: the right decimal point flashes when the projector
receives a command, and the left point flashes when the projector sends a command.
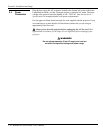
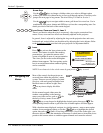
6-Axis Adjuster
The projector provides the ability of modifying the geometry of a displayed image
using the uniquely designed 6-Axis adjustment mechanism. This mechanism is
shipped from the factory in a nominal position and can be adjusted using a 3/16” ball
driver. All adjustments made to the adjuster can be “locked” into place by tightening
the lock screws and setscrews. Instructions and tools required to adjust the 6-axis can
be found in the User’s Kit.
Laser radiation is emitted from the laser diode in the remote. Do not look
directly into the beam of the remote.
The projector is controlled via an IR remote keypad. The keypad accesses various
menus in which settings can be changed and saved into memory (called channels).
There are 50 channels in which you can store customized settings for various sources.
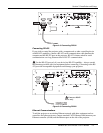
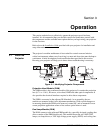
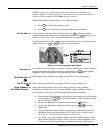
The IR remote keypad provided in the User’s Kit provides the user with wireless
control of the projector of up to 100 feet away. The most effective method of
operating the projector is by facing and pointing the keypad directly at the screen.
There is only one IR sensor that picks up the transmissions of the keypad and it is
located just below the lens. It is important to keep the transmission path clear because
any obstruction will limit if not prohibit transmission of commands.
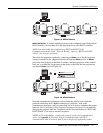
NOTE: This keypad has a single IR protocol and can be converted to a wired remote
by connecting the cable provided with the projector to the mini stereo connector
labeled as
REMOTE on the input panel.
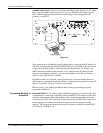
The IR remote keypad controls the projector by way of wireless communications from
a battery-powered infrared (IR) transmitter. Use the IR remote keypad the same way
you would use a remote keypad supplied with a TV or VCR. When making key
presses, direct the keypad either toward the screen or toward the front of the projector.
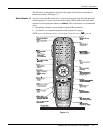
3.2 Using the
Remote
Keypad
Ke
yp
ad Commands '
IR Remote '