


Section 3: Operation
3-48 RPMSP & CSP70-D100U User’s Manual
When you manually select a new lamp operation, the lamp turns off only after
the new lamp has successfully been turned on. On rare occasions, a lamp will
not strike on the first attempt. The projector, in this instance, has been
designed to attempt a re-strike of the lamp. With the current lamp still on, the
projector waits 30 seconds before initiating another lamp strike. During this
time, on-screen messages will appear until the lamp is successfully turned on.
The projector attempts to re-strike a lamp up to 3 times after the initial change
in lamp operation modes. With the 30-second wait period in between each
attempt, the projector may seem like it is not responding for up to a total of
two minutes. You can press any key during this time to cancel and return to
the original lamp operation mode. If you cancel the operation or the attempts
to strike the lamp have failed, the lamp is declared, “failed to strike” and the
projector remains in the original mode.
The same occurs if you are attempting to switch from Single to Dual lamp
mode; the projector reverts to the single lamp mode for the lamp that is
working.
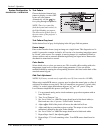
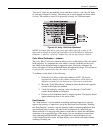
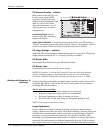
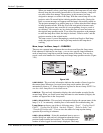
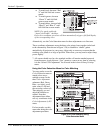
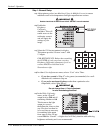
More, Lamp 1 or More, Lamp 2 – SUBMENU
There are two separate lamp submenus that can be accessed from the Lamp menu.
Each submenu is dedicated to one lamp – you can view specific lamp information,
such as lamp hours, lamp history and the current status of the lamp. You can also
record a new serial number for a new lamp and change lamp operation modes. (Figure
3.26.)
Figure 3.26.
LAMP HOURS – This read-only information indicates the number of hours logged on
the current lamp. Whenever you record a new lamp serial number, this value
automatically resets to “0”, where it begins to log time for the new lamp. NOTE: You
can also check Lamp Hours in the Status menu.
LAMP S/N – This read-only information displays the serial number recorded for the
current lamp. When you install a new lamp and enter its serial number (9-digits), the
number will appear here in the Lamp menu.
LAMP 1 (OR 2) STATUS – This read-only information displays the current status of the
lamp (1 or 2). An extremely valuable piece of information for troubleshooting, the
Lamp Status can be any one of the six following states: “Good”, “Cooling Fan #3
Failed”, “Cooling Fan #5 Failed, “Interlock Tripped”, “Failed to Strike” and
“Turned Off Unexpectedly”. You can view the status of a lamp anytime during
operation by accessing its submenu.
LAMP 1 (OR 2) HISTORY - Select this numbered item to access a
smaller dialog box with read-only information about the history
previous lamps installed and recorded. The serial number and
number of hours logged for each lamp is displayed. The Lamp