


Section 4: Maintenance
RPMSP & CSP70-D100U User’s Manual 4-7
.
Replacing a Lamp:
Turn the projector off – If your presentation allows, it is strongly recommended
that you power down the projector prior to replacing a lamp. Press
Power
*
to power
down the projector. The projector fans will continue to operate for a short cool-down
period. It is recommended that you wait approximately 5 minutes to allow lamps to
cool before replacing.
WARNING
It is strongly recommended that you allow the lamp to cool before
replacing – approximately 5 minutes.
HOT-SWAP ALTERNATIVE
Read About Lamp Hot-Swap on the previous page before proceeding.
If you choose to replace a lamp without disrupting the current presentation, it is
recommended that you switch to the Single Lamp mode for the lamp you are not
going to replace. Then proceed with Step 2. NOTE: The projector will not
automatically return to its original Lamp Mode after lamp replacement. This must
be done manually, if desired.
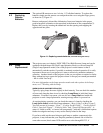
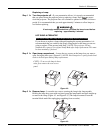
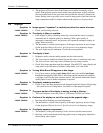
Open lamp compartment – Loosen the two screws on the lamp door you want to
open. Swing the door open. (Figure 4.2.) NOTE: Each lamp door is spring-loaded and
needs to be held open during lamp replacement.
Figure 4.2.
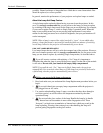
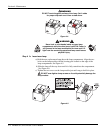
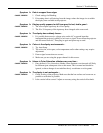
Remove lamp – Loosen the two screws securing the lamp in the lamp module.
Holding the lamp door open with one hand, grasp the lamp handle and pull straight up
to remove the lamp. (Figure 4.3. and Figure 4.4) (The lamp disconnects from the
terminal block much like unplugging something from an outlet.)
Figure 4.3.
Ste
p
1 '
Ste
p
2 '
Ste
p
3 '
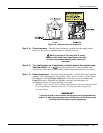
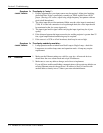
CSP70 – To access the lamp in these
units, first remove the rear access
p
ane
l.