


Section 3: Operation
RPMSP & CSP70-D100U User’s Manual 3-27
.
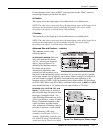
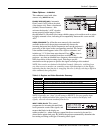
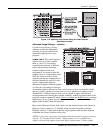
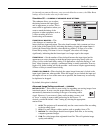
may prefer to use the Input Levels menu (shown above). These adjustments, which
together serve as a calibration process compensating for differences in sources and
cabling, enable an experienced user to perfect the source image input levels and
eliminate the “overshoot” and “undershoot”. Note that Input Levels are of limited use
with digital signals, but do offer some ability to tweak poorly mastered source
materials.
NOTES: 1) Input levels apply for the current source only, but for any color
temperature used. 2) Assuming that color temperature has been set up based on the
internal test patterns, you can then set up input levels for a given source so that it
matches the color temperature of the internal test patterns.
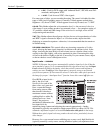
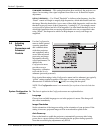
AUTO INPUT LEVEL – Temporarily enter a checkmark only if you are an experienced
user and you have an unusual source that you feel needs further color temperature
and/or input level adjustment. This compensates for incoming out-of-range drives
(white) and blacklevels (black) that would cause “crushing” of light and dark colors in
the image. After entering a checkmark, wait for the six slidebar values to stabilize,
then delete the checkmark and exit. The Auto Input Level is automatically turned off
upon exiting the Input Levels menu.
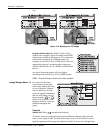
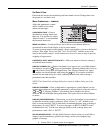
BLACKLEVELS AND DRIVES – To check your image levels and adjust these controls:
1. Make sure overall “Contrast” and “Brightness” settings are both set to near
50. NOTE: Not required for “Auto” adjustment.
•
Contrast
= 50 (approx.)
•
Bright
= 50 (approx.)
2. Check the color temperature setup using an internal grayscale test pattern,
making sure to obtain a neutral grayscale. NOTE: Not required for “Auto”
adjustment.
3. Confirm that you are using an analog source not connected to
INPUT 3 or
INPUT 4, as Input Levels are not applicable for digital sources or sources
going through the decoder. A grayscale is recommended.
4. If the blacks and/or whites appear OK, input levels do not need adjustment. If
black levels are too high (and/or whites are too low, which is rare), you likely
have a noisy source that is producing skewed input levels. Continue with Step
5.
5. Temporarily enable “Auto” in the Input Levels submenu. Wait for all 6 values
to stabilize. Alternatively, do not use “Auto”—reduce blacklevels manually
instead. Judge by eye and change one or more of the six levels as necessary to
obtain proper blacks and whites. You may want to see only a certain color
while adjusting—use the “Color Enable” option (described below).
6. Delete the “Auto” checkmark and leave the Input Levels menu.
IMPORTANT: Do not use Input Levels to adjust color temperature. This will distort
Contrast and Brightness functions as well as color temperature.
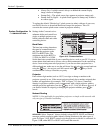
AUTO COLOR ENABLE – When a checkmark is present, selecting a specific blacklevel
or drive to adjust will automatically enable the corresponding color in the display.
Delete the checkmark to see all colors, or to enable a different specific color through
the Color Enable Control.