


Section 4: Maintenance
RPMSP & CSP70-D100U User’s Manual 4-9
.
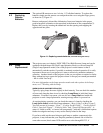
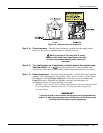
Figure 4.6. Inside the Lamp Compartment
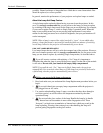
Close lamp door – Once the lamp is inserted, carefully close the spring-loaded
lamp door and lock it by tightening the two lamp door screws.
Watch your fingers! The lamp door is spring-
loaded and will snap close. Keep fingers clear from
the lamp compartment opening when closing the
lamp door.
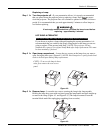
Turn the Projector on (if applicable) or Switch back to the original Lamp
Operation Mode – Press
Power
*
to turn the projector on. If you performed a hot-
swap, use the Lamp menu to return to the original lamp operation mode you were in.
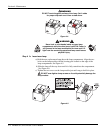
Reset Lamp Hours – Access the Lamp menu (item 5. in Main Menu) and select the
submenu for the lamp that you are replacing – More, Lamp 1 or More, Lamp 2. From
the submenu, select the Change Lamp option. Enter the new serial number in the
Lamp S/N text box. When the new number is recorded, the lamp timer will
automatically reset to “0” hours and begin to log time.
NOTES: 1) Once entered, the new lamp serial number is also automatically added
to the Lamp History submenu (read-only). 2) Lamp life data is required for
warranty claims.
IMPORTANT
If you fail to enter a serial number the lamp timer will not automatically
reset to “0” and inaccurate lamp hours will be shown in the Status menu.
The lamp life limit may then expire prematurely.
Ste
p
5 '
Ste
p
6 '
Ste
p
7
'