


Section 3: Operation
RPMSP & CSP70-D100U User’s Manual 3-5
.
NOTE: Channel (
Channel
)
key behavior during a presentation depends on whether or not
the Display Channel List option is enabled in the Menu Preferences menu. You can
choose to use a scrollable list of channels when you press
Channel
, or you may prefer to
enter the desired channel number “blind”, i.e., without on-screen feedback. See Menu
Preferences later in this section.
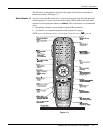
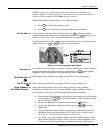
Input 1
Press
Input 1
to display from the data input source connected to BNCs labeled
INPUT 1.
If PIP is enabled, pressing this key will change the PIP source.
Input 2
Press
Input 2
to display from the DVI source connected to INPUT 2. If PIP is enabled,
pressing this key will change the PIP source.
Input 3
Press
Input 3
to display from the composite video source connected to INPUT 3. If PIP is
enabled,
pressing this key will change the PIP source.
Input 4
Press
Input 4
to display from the S-video source connected to INPUT 4. If PIP is enabled,
pressing this key will change the PIP source.
Input 5
Press
Input 5
to display from the INPUT 5 interface module installed in the Option 1. If
PIP
is enabled, pressing this key changes the PIP source. If there are two inputs
connected here, such as if the Dual SD/HD-SDI is installed, the second input (B) is
considered
INPUT 7. Press INPUT 5 to access INPUT 7 as follows:
• While displaying from
INPUT 5, press
Input 5
again. This switches to INPUT 7.
• While displaying from any input other than the Dual SD/HD-SDI Module,
press
Input 5
. This switches to either INPUT 5 or INPUT 7, depending on which of
the Dual SD/HD-SDI Module inputs (A or B) was last used. Press
Input 5
again to
display from the other Dual SD/HD-SDI Module input.
Input 6 – no function
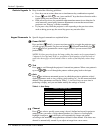
Brightness
Press
Bright
to increase or decrease the amount of black in the image. Use
keys until you reach the desired level of contrast—for best results, start high and
decrease so that dark areas do not become black (i.e., “crushed”). Conversely, overly
high brightness changes black to dark gray, causing washed-out images. See 3.5,
Adjusting the Image (Image Settings subsection). NOTE: Always adjust brightness
before contrast.
Contrast
Press
Contrast
to change the amount of white in your images. Use keys until
you reach the desired level of contrast—for best results, start low and increase so that
whites remain bright but are not distorted or tinted, and that light areas do not become
Input 1
Input 2
Input 3
Input 4
Input 5
Input 6
Bright
Contrast