


Section 3: Operation
RPMSP & CSP70-D100U User’s Manual 3-57
.
For best results, use the same projector model and type throughout your display wall.
In addition, avoid high-gain screens whenever possible—the optical performance of
such screens demands minimal image offset, thus projectors must be located very
close to one another. Note too that the requisite tiling of the image—with data
repeated along internal edges that will overlap—must be correctly done by your
source.
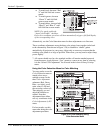
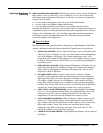
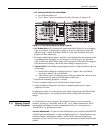
Standard edge blending software controls are located in the 2-page Edge Blending
submenu access via Configuration menu, then Geometry and Color submenu, then
Edge Blending. The More option opens the second page of the Edge Blending
submenu.
Main Functions
Use standard edge blending controls to set the precise width, shape and midpoint you
need to blend overlapping edges together smoothly.
Blend Width determines how much area is used for blending along an
overlapping edge. Slidebar values represent the number of 8-pixel steps used
for the blend. For example, a setting of “3” creates a blended edge 24 pixels
wide. A setting of “0” signifies no blending. For best results in most
applications, use a blend width of 16-48 steps (128-384 pixels).
Ranges: 0-80 horizontal, 0-60 vertical.
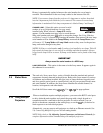
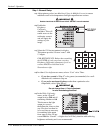
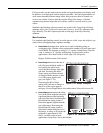
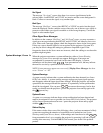
Blend Shape determines the rate of
roll-off across the blend width, i.e.
how quickly the white levels
across the blend change from light
and dark. Increasing the Blend
Shape setting accelerates the rate
of change at both extremes so that
less of the region appears mid-
gray (see Figure 3. 34).
Decreasing the Blend Shape
setting slows the rate of change so
that more of the region appears
mid-gray. For most applications, this subtle control is best left close to 50.
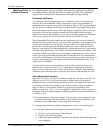
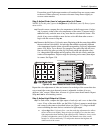
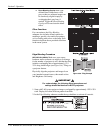
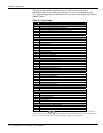
Blend Midpoint determines the white
level at the blend midpoint (the point
equidistant between the beginning
and end of the blend). Increasing the
Blend Midpoint setting creates a
blend that appears brighter than the
rest of the image. Decreasing the
Blend Midpoint setting creates a
blend that is darker than the rest of
the image. A setting of 50 means the
midpoint is approximately 50%
black—for best results in most
applications, keep fairly close to this default.
Figure 3. 34. “Shape” Examples
Figure 3. 35. “Midpoint” Examples