


Section 3: Operation
3-52 RPMSP & CSP70-D100U User’s Manual
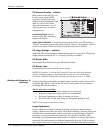
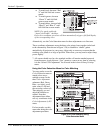
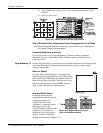
To match reds, decrease “Red
X” until full field red screens
match.
To match greens, decrease
“Green Y” until full field
green screens match.
To match blues, increase both
“Blue X” and “Blue Y” until
full field blue screens match.
NOTE: For speed, enable the
“Auto Color Enable” checkbox.
Each color coordinate you select will then automatically trigger a full field display
of the corresponding color.
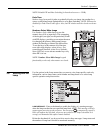
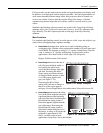
Alternatively, use the Color Saturation menu for these adjustments or to fine tune.
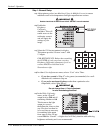
These coordinate adjustments move the three color points closer together (refer back
to the chromaticity chart shown in Figure 3.20.) to establish a “shared” gamut
attainable by all projectors in your group. Adjust only as necessary to ensure that the
resulting color palette is as large as possible. When done, you may need to adjust lamp
power slightly.
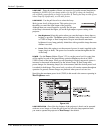
7. All screens should now be color-matched and the will remain matched upon exit
from the menus. Apply this new “User” gamut to a source at any time by selecting
it in the “Select Color Adjustment” list accessed in the Advanced Image Settings
menu.
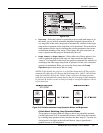
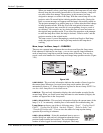
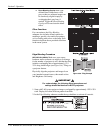
Using the Color Saturation Menu for Color Matching
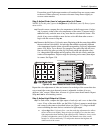
You may prefer to use the
Color Saturation menu to
match colors across
multiple screens. In the
three Color Adjustment
submenus (Red, Green,
Blue—see right), set all
main values to 100 and
the secondary values to 0.
Then judge by eye and
adjust the slidebars as
needed. Note that
adjustments here define
new x/y coordinates in the
Color Adjustments by X,Y
menu.
For best results, use this
menu after doing the color
adjustment procedure.
Figure 3.29. Color Matching Using
Color Saturation Menu