


Section 3: Operation
RPMSP & CSP70-D100U User’s Manual 3-49
.
History is automatically updated whenever the serial number for a new lamp is
recorded. The information for the new lamp is added to the bottom of the list.
NOTE: If you remove lamps from the projector it is important to replace them back
into the compartment from which they were removed. This ensures accurate lamp
information is maintained. Each lamp compartment is labeled Lamp 1 and Lamp 2.
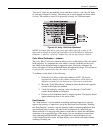
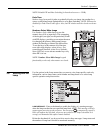
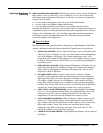
CHANGE LAMP – Select this option to record a serial
number of up to 9 digits/characters for every newly
installed lamp. When selected, a Lamp S/N window
appears. Use the number text entry keys to record the new
lamp serial number and press
Enter
again to accept the change. See Using Slidebars
and Other Controls if you need help entering the number. Once entered, the new lamp
serial number will be added to the Lamp History menu and the Lamp Hours timer
will reset to “0”. Lamp Mode and Lamp Limit remain as they were for the previous
lamp, and can be changed at any time.
NOTES: 1) Enter a serial number only if you have just installed a new lamp. This will
help ensure the lamp timer is not reset on an old lamp and that the number of hours
logged on the lamp will be accurate. 2) Lamp serial number can be found on the lamp
itself.
IMPORTANT
Always record the serial number of a NEW lamp.
LAMP OPERATION – This option is the same as in the Lamp menu. It appears again in
the submenu for convenience.
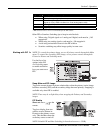
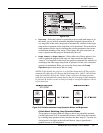
The read-only Status menu lists a variety of details about the standard and optional
components currently detected in the projector. Refer to the Status menu for versions
of hardware and software installed, the type (size) of lamp, the hours logged in total
and for a specific period (such as a rental period), and for your projector model name
and serial number. In addition, the Status menu identifies the current channel, its
location, its frequencies and other details.
Scroll the full Status menu using
. Use for page up/down.
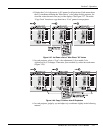
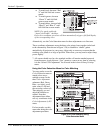
When an installation requires multiple projectors, you can use the RS232 serial ports
to daisy-chain the units together and control the group with a single keypad or a
computer/controller connected to the first projector. In such a network, you can
choose to broadcast commands to the entire group, or use the
Proj
key as desired to
limit responses to an individual projector.
Alternatively, you may want to add projectors to a hub on an Ethernet network. See
2.6, Connecting Multiple Projectors for full routing details.
NOTE: Refer back to 3.6, Adjusting System Parameters and Advanced Controls for
complete information about communicating with multiple projectors.
3.9 Status Menu
3.10 Using Multiple
Projectors