


Section 3: Operation
3-20 RPMSP & CSP70-D100U User’s Manual
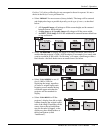
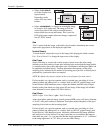
• Select “FULL HEIGHT”
to fill the display from
top-to-bottom.
Depending on the
source, this may create
borders.
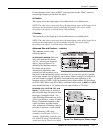
• Select
“ANAMORPHIC” to display an anamorphic image
in its native 16:9 aspect ratio. The image will fill the
screen from side-to-side, and be centered between
narrow black bars on top and bottom. This is used for
DVD players that output widescreen images compressed
into 4:3 NTSC format.
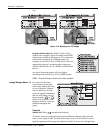
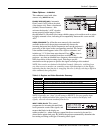
Size
“Size” controls both the image width and height in tandem, maintaining the current
aspect ratio (proportion) of the displayed signal data.
Vertical Stretch
“Vertical Stretch” adjusts the height of the image while keeping the width constant.
Use “Vertical Stretch” to change the aspect ratio of the display.
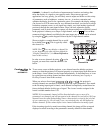
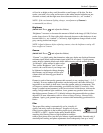
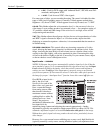
Pixel Track
Steady flickering or several soft vertical stripes or bands across the entire image
indicates poor pixel tracking. Proper pixel tracking helps ensure that the image quality
is consistent across the screen, that aspect ratio is maintained, and that pixel phase can
be optimized (described below). Tracking determines the frequency of the pixel
sampling clock, indicated by the number of incoming pixels per line, so that all pixels
generated by a particular source are sampled.
NOTE: By default, the projector samples at the correct frequency for most sources.
For best results, use a good test pattern such as a smooth gray consisting of a clear
pattern of black and white pixels, or a similar “half on, half off” graphic image, such
as the Windows 2000 shutdown screen. Adjust the slidebar until the vertical stripes
broaden to the point where one large stripe fills the image. If the image still exhibits
some shimmer or noise, adjust Pixel Phase (below).
Pixel Phase
NOTE: Adjust “Pixel Phase” after “Pixel Tracking”.
Adjust pixel phase when the image (usually from an RGB source) still shows shimmer
or “noise” after pixel tracking is optimized. Pixel phase adjusts the phase of the pixel
sampling clock relative to the incoming signal.
For best results, use a good test pattern such as a smooth gray consisting of a clear
pattern of black and white pixels, or a similar “half on, half off” graphic image, such
as the Windows 2000 shutdown screen. Adjust the slidebar until the image stabilizes
and each pixel is clearly defined. You may notice that you can stabilize the image at
more than one point—i.e., you may find that the image appearance at “11” is identical
to the image appearance at “38”, thus you can use either setting.