


132 Chapter8
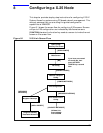
Configuring a X.25 Node
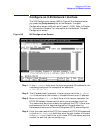
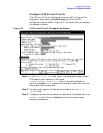
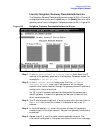
Configure an X.25 Network Interface
NOTE
An address key called POOL is already preconfigured for you though it
doesn’t show up on the screen. POOL allows the node being configured to
receive any incoming calls even if the remote system’s address is not
configured on this screen. POOL will also allow you to use NetIPC to
programmatically provide an X.25 address that is not configured on this
screen. If you want to delete the POOL address key, in the last line of the
X.25 Virtual Circuit Configuration screen enter a 3 (for switched VCs)
and press the
[Go To] key. That brings you to the X.25 SVC Address Key
Paths screen where you can then remove the default name POOL by
typing over it with spaces and then saving the data.
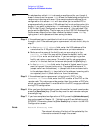
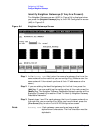
Step 4. If the address type is a switched virtual circuit complete steps a
through c, but if the address type is a permanent virtual circuit, skip to
step 5.
a. In the Remote X.25 address field, enter the X.25 address of the
remote host for X.25 public data networks or private networks.
b. Make sure the name of the facility set you are using is in the
Facility set field. You may either choose the default facility set
(STDSFSET) or enter an alternative. If you are configuring a new
facility set, enter a new name. (To modify facility set parameters,
enter a 5 in the last field on the screen and press the
[Go To] key.)
c. In the Security class field, enter the level of logical security you
want to have on this particular entry. The possible values are IN
(accept calls from the address), IO (accept calls from and send calls
to the address, default), OU (send calls to the address, incoming calls
are rejected), and LK (block calls to or from the address).
Step 5. If the address type is a permanent virtual circuit (PVC), in the
Permanent VC number field, enter the PVC number of the PVC on the
remote node. This value cannot be greater than the number of PVCs for
which you are subscribed. It must be within the PVC range you defined
during DTC configuration.
Step 6. After you have finished entering new information for each remote node,
press the
[Save Data] key. (Press the key once for each remote node you
are configuring.)
Step 7. If you have completed configuration of X.25, press the
[Validate Netxport]
key and proceed to Chapter 10 , “Validating and Cross-Validating with
SYSGEN.” Otherwise, press the
[Prior Screen] key to return to the X.25
Configuration screen.
Fields Network directory name
The network directory file that will be updated by the
information entered through this screen.