


Chapter 11 157
Configuring the Network Directory
Add Nodes to Network Directory File
Add Nodes to Network Directory File
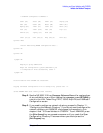
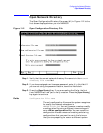
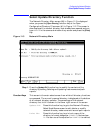
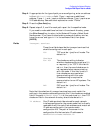
The Network Directory Select Node Name screen (#9) in Figure 11-4 is
displayed when you press the
[Update Dir] function key at the Network
Directory Main screen (#8) in Figure 11-3. The function of this screen is
to display node names that are currently configured in the directory,
and to allow you to delete, rename, add, or modify information about a
node.
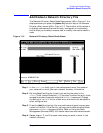
Figure 11-4 Network Directory Select Node Name
Step 1. In the node name field, type in the node name of one of the nodes on
your network for which you want network directory information.
Step 2. Set the global/local flag for the entry by setting the value in the
Global? field. Leave the default (Y) if you want to allow this entry to be
merged into other directories using the MERGEDIR command. Change
the setting to “no” (N) if this is a local entry and should not be copied to
other configurations.
Step 3. Press the
[Add] function key. You may add new entries as long as room
remains in the file. If the file fills, you may use the Maintenance Mode
command EXPANDDIR to expand the file. Refer to Using the Node
Management Services (NMS) Utilities for details on maintenance mode.
Step 4. Repeat steps 1, 2, and 3 for each node name you want to enter in the
network directory.