Check the installation cable
1 Disconnect the installation cable, and check it for any obvious damage.
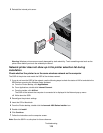
2 Firmly plug the rectangular end of the USB cable into the USB port of the computer.
The USB port is marked with the
USB symbol.
3 Firmly plug the square end of the USB cable into the USB port on the back of the printer.
4 From the Finder desktop, double-click the Lexmark 4800 Series folder.
5 Double-click Wireless Setup Assistant.
6 Follow the instructions on the computer screen.
Changing wireless settings after installation
Use the Wireless Setup Assistant to change your password, network name (SSID), or other wireless setting.
1 From the Finder desktop, double-click the Lexmark 4800 Series folder.
2 Double-click Wireless Setup Assistant.
3 Follow the instructions on the computer screen.
Checking your network name
Make sure your network does not have the same name as another network near you. For example, if you and your
neighbor both use a manufacturer's default network name, your printer could be connecting to your neighbor's
network.
If you are not using a unique network name, consult the documentation for your wireless access point (wireless
router) to learn how to set a network name.
If you set a new network name, you must reset the printer and computer SSID to the same network name.
• To reset the computer SSID, see the documentation that came with your computer.
• To reset the printer SSID:
1 From the Finder desktop, double-click the Lexmark 4800 Series folder.
2 Double-click Wireless Setup Assistant.
3 Follow the instructions on the computer screen.
Ping the access point
1 Check the status of AirPort and, if you do not already know it, find the IP address of the wireless access point
(wireless router).
a Click Apple menu System Preferences.
b Click Network.
c If necessary, select Network Status in the Show pop-up menu.
The AirPort status indicator should be green. Green means the port is active (turned on) and connected.
Notes:
• Yellow means the port is active but is not connected.
• Red means the port has not been configured.
d From the Show pop-up menu, select AirPort.
Troubleshooting
121


